Color Selection in KNK Studio

roundcorner

How can I color thee? Let me count the ways…
There are SO very many tips and tricks with color selection that it’s hard to name them all, but here are a few to get you started. First off, you can grab a sample file to play with from this link:
Sample File for Color Selection.

roundcorner

(1) Always have the Job Palette turned on: View>Job Palette so you can see what colors have been used in any project. Look for white or invisible colors and get rid of them. With Fill turned off, they will appear with black outlines and you will mistakenly think they are black. The only time it’s useful to leave them that way is for print and cuts where you may not want cut lines to be printed. But other than than, I find these serve no useful purpose to paper crafters.

In this file, I have BOTH showing and there are a few ways to eliminate them. You can go back to my post on May 2 and watch the video that shows you how to change them to ANY other color… just not white or invisible or clear, OR you can use the method in the next step.

roundcorner

(2) Double click ANY color on the Job Palette and all objects of THAT particular color will be selected. You can then send those colors to be cut, resized, copied/pasted, etc. This is useful when, say, you’re in a swap and you have a detailed paper piecing with a variety of colors and you need to cut multiples and want to copy/paste the items, one color at a time, into a new document so you can multiply them to cut however many copies you’ll need from that one sheet of cardstock. In the case of our file here, we will double click the white color and then click on Black at the bottom to change all of the white images to black. Repeat with the invisible color. Now your image still looks the same, but the invisible and white are now converted to black.

(3) Okay… now say you need TWO colors at once. The first color could be a particular item and the second color could be details on that item that will be pounced or drawn with pen. Or, in this file, let’s say you want to cut the outside mat of all four words from the same color of cardstock, even though one color is blue and the other is orange. Simply double click the blue color and then, holding down the SHIFT key on your keyboard, double click on the orange color. All items of BOTH colors will be selected. You can continue to hold down the Shift key and double click more colors as desired.

roundcorner

(4) Now… let’s have a look at another way to do it… Hold down the Alt key on your keyboard and click the color you want. Now you’ll see all of the other colors become cross-hatched and their corresponding lines in the image become dashed lines. This means those colors are hidden and you cannot select them. In this case I’ve performed an Alt- click on Red to hide all colors but red:

roundcorner

(5) If you wish to “unhide” another color, just hold down the Ctrl key and click on that color. In this case, I held down Ctrl and clicked on the green button (look for a tiny bit of color still showing in the hatched region). Now red and green are available, but all the others are still hidden and cannot be selected.

(6) Now click on Alt and click on either red or green twice and all the colors will be restored. If you wish to hide only one color, then hold down the Ctrl key and click on that one color and it will become dashed on the screen and cannot be selected. You can continue to hold down the Ctrl key and click other colors to hide them. Clicking a second time with Ctrl key held down will restore them… thus it works as a toggle.
Now, play, play, play with this until it becomes second nature to select by color in ALL the ways available to you!

KNK Studio versus KNK Studio Element

On May 1, I posted the differences between the regular KNK Studio and KNK Studio GE. Now the question has arisen about the differences between regular KNK Studio and KNK Studio Element. It’s my understanding that the Element version only installs the drivers for the KNK cutters and it’s the version that ships with an Element and the 13″ KNK. Now that all the new KNK’s are direct USB, it doesn’t matter if you pick Element or Klic-N-Kut as the driver in this or the other edition… they both will work the same. The Element edition, however, does NOT contain the drivers for the Craft Robo/Wishblade/Silhouette nor for the AC40/KNK Pro/Pazzles Pro.

Now that I’ve THOROUGHLY confused you, if you have KNK Studio Element and you really need to cut to your 8″ Graphtec cutter or to an AC40/Pazzles Pro from it, then there’s a way to do that, too. If you’re one of my customers, just email me and I’ll help you with that. If you purchased your KNK from another dealer, then let them know you want to be able to cut to your 8″ Graphtec cutter and they should be able to assist you. 🙂

From Corel to KNK In a Flash!

Before I get to today’s topic, note that I added a subscribing link to the right side menu for anyone wanting to be notified about new posts here. 🙂

Okay… anyone out there use Corel Draw? Well there’s a real cool tie-in between this program and KNK Studio where you can transfer images in a click! First you’ll need to down a small executable file from CADLink called the Corel to Sign Lab Patch. Here’s a link and note that you’ll need to register, but it only takes a moment:

Once you have the file saved to your hard drive, run it and make sure you browse to your Klic-N-Kut Studio folder if it’s not automatically selected. That would normally be c:/Klic-N-Kut Studio (or it may have Element or GE after Studio).

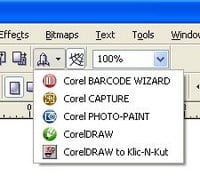
Then, once that’s done, open up Corel and KNK Studio. Open your Corel file or design your images and select them. Then click on the Rocket icon on the upper task bar as shown in this figure:

A drop down menu will appear. Select the last option (CorelDRAW to Klic-N-Kut):

Your KNK Studio window will immediately pop up and you will see the “L” cursor, indicating you have something to paste into your document area. Simply left click once and the images from Corel Draw will be pasted into KNK Studio:

A Miscellany of Useful Tips

I had several new things that popped up this weekend, so I think I’ll just cover all three in one post:

(1) A couple of new links to recommend:
http://www.picsearch.com/(type in anything you are seeking and it will find images all over the Internet with that name in the file… great for finding images to trace).
http://www.theperfecttitle.com/ (a great site to find interesting and different titles for your scrapbooking layouts, sorted by theme for easy searching)
Coloring Page of the Day: see the bottom of my blog for the link. While these aren’t vector pdf’s, they do import easily into KNK Studio and yield some great tracing results, using default settings. Check back every day to see if you can use the latest image. Also note the site has past coloring pages arrange by theme to download.
(2) A GE owner had been playing around with the Shop Palette and inadvertently saved her new configuration as the default. I’ve done this myself and I’m not sure what happened, but there is a fix. First of all, try clicking on the Context Menu icon on the Shop Palette (it’s the one with the three little dots). In that menu, click on Reset and see if the original palette is restored. If not, then you need to replace a file called factorydefault.pal with the original… which can be downloaded from: https://www.iloveknk.com/ImportantFiles/KNKStudioFiles/. Simply save this file into c:\Klic-N-Kut Studio (or whichever folder contains your KNK Studio installation). Answer OK or YES when asked if you want to replace the existing version. Open KNK Studio and you should have the original restored.
(3) One of the readers here asked for an example showing masking. I thought about it and the best example that came to mind would be file where you have several objects that are different colors and you want to create an outline around those objects, but retain their original colors (Let’s say you want to cut Happy Birthday from different colors of cardstock and have the letters adhered to a mat). In the Transform>Outline window, make sure both of the icons on the far right are indented: Keep Original and Create Mask. Create your outline and after closing, you will, for some reason, have a duplicate of your original images in the new trace color. Simply delete it and you will also have your originals in the individual colors. In the following figure, I show the three steps: the individual letters colored, the image right after closing the Transform>Outline window, and finally the result after deleting the copy of the letters that gets created and placed on top of the originals:

The Hottest of the Hot Keys!

If you’ve never browsed Appendix A of the KNK Studio, KNK Studio GE or the Design Master User Manual, then you should take an hour, sit down with your favorite “hot” beverage and play with these “hot” shortcuts! Note that it took 3 pages in each of those manuals to cover all of the hot keys in this program! That, in itself, should get you excited about the possibilities of finding some real jewels to make your designing and image manipulation life easier! 😛 Also note that there are plenty of unused keystrokes remaining that YOU can use to create any additional hot keys not covered already. I have a tendency to just add icons to my custom toolbar, as needed, but there is ONE very handy hot key that you might be interested in adding and it’s listed at the end of my list below.

My list contains the ones that have truly made my life better. Naturally everybody’s needs are different, so I wouldn’t be at all surprised to see YOU have a different list of favorites. The purpose of my list is to get you to check out these particular hot keys and see if they aren’t worth taking note and practicing. Remember that it only takes 3 weeks to make something a habit.

Ctrl-A : Used to select ALL objects (great when you’re not sure the marquis-select has truly captured the entire screen

Ctrl-D: Used to make a duplicate of whatever is selected. You can control where that duplicate is automatically located under Options>Klic-N-Kut Setup>General Preferences (or for those with DM, it’s Options>CraftROBO Setup>General Preferences)

Ctrl-F and Ctrl-B: Used to move objects to the very front or the very back. When dealing with paper piecing patterns and you have Fill turned on, it’s nice to be able to move the individual pieces to a location (an order) that matches how you would glue them to your layout. Note that Ctrl-U and Ctrl-L will move them one level, up or down, at a time when there are more than two objects involved.

L, R, T, B: I LOVE THESE FOUR…. no extra Ctrl or Alt or Shift keys involved. Simply select two or more objects and typing those keys will align the objects all to the Left, Right, Top, or Bottom, respectively!

Alt-7 : A BIG favorite since Ifirst got hooked on KNK Studio – this function, when applied to two or more objects, will center them. This is great when creating frames for welding.

Alt-S: Toggles Fill… useful when you forget there’s actually a spilling can icon up on your Smart Bar that does the same thing! lol But hey, I forget and find myself using it, so it’s worth listing. 🙂

Alt-W: A new one I had forgotten… toggles guidelines on and off… again, a great choice when you’re tired of viewing your guidelines, but not quite ready to just delete them all.

O: when in the node edit mode, select a node, and then type the letter “O”… it will turn the path for that node into a perfect circle! This is great when editing an auto-tracing and you receive slightly less than desirable results with small items such as eyes, wheels, button noses, flower centers, etc! Definitely test this if you’ve never tried it before.

I promised you my FAVORITE made-up key stroke and I think it might be “A : Unselect All Objects.” I’m frequently teaching new KNK owners how to “click away” and many don’t quite get it when I use that term. By setting the letter “A” to be the opposite of Ctrl-A, I keep it simple to comprehend, quick to remember, AND easy to execute. Note that Shift-F3 is also “Unselect All Objects”, however after a year, I just cannot seem to keep that keystroke at the tip of my fingers! Thus, i find a simple “A” to be MUCH easier! 🙂

Oh… and before I go… the instructions for how to set up a custom hot key are at the end of Appendix A. Think about what might make your KNK Studio experience much better! 🙂