by Sandy McCauley | Apr 30, 2010 | AI Files, Cupcake Wrapper, Free Files, PDF

With graduation just around the corner and a few recent posts by readers here inquiring about the cupcake wrappers, I decided to post new links for downloading these terrific files. All of these particular cupcake wrappers were designed and shared by Judy Keating, a very talented and successful owner of a Klic-N-Kut Maxx. She designs these wrappers in KNK Studio but also has exported the files in both AI and SVG formats. Those of you needing the files in DXF, should be able to use Inkscape (free from Inkscape.org) to open the SVG’s and then save as DXF for your particular software program.
As with ALL cutting files you buy or download for free, test cut them first from inexpensive cardstock. In particular, with the cupcake wrappers, be sure to check the sizing. You may need to increase or decrease to fit the actual cupcakes you make or buy. Many of these designs are quite intricate, so use a clean sticky mat to keep your paper or cardstock firmly pressed down during cutting.
Also note that there is also a link below to download a template/pattern file so that you can add your own words and images to weld to the same base framse used by Judy in her designs. If you would like to share your own design with all of the other readers here or just a photo of your custom wrapper, please send it to me at smccauley45@cox.net .
Judy’s Cupcake Wrappers in KNK Format
Judy’s Cupcake Wrappers in SVG Format
Judy’s Cupcake Wrappers in AI Format
Design your own!
*** New *** Cupcake Wrapper Templates for Designing in KNK, MTC, SVG, EPS, PDF, and Studio formats
(Big thanks to Judy Keating for sharing her designs and to Gayle Galura-Scott for converting to .Studio for the Silhouette owners!)
Thanks, once again, Judy for your generous contribution to the cutting world! : )
by Sandy McCauley | Apr 23, 2010 | Coloring Book, Free Videos, Line Style, Welding

Thanks to Sharon M for today’s topic about converting a paper piecing project into a coloring book image. It’s very simple to do and it only took a few steps to show the basic procedure:
Creating a Coloring Book Image
However, there were a few things that were a little different about Sharon’s project so it provided an opportunity to cover a few more features in the software, specifically how to weld some of the individual pieces before using the Thick Line Attribute. And also how to die cut one image from another. Both of these have been covered in previous posts, however this project gave new applications.
As usual, as I’m typing this now, I realize that I forgot one of the important tips when recording today’s video. UGH!!! When you have completed your coloring book image, you may wish to save it as a PDF file OR even convert it to a JPG or BMP. For PDF, just go to File>Publish to PDF. Remember to uncheck the box which forbids printing:

Whether or not you choose to forbid editing is entirely up to you. : ) You will need to select a password if you do choose that option.
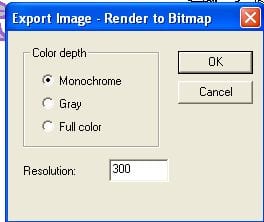
If you wish to export as a JPG or BMP, select the image first, then go to File>Export image and you can select Monochrome since it will be a black and white image. Normally, 300 is the standard resolution used in digital images, so I would recommend leaving that at 300.

Of course, if you are doing this with a colored image, then leave the Full Color option checked.
The last step will be to name your exported image, select a location on your computer to save it, and then you have your choice of five raster formats: .bmp, jpg, .pcx, .png, or.tif.
So, have fun converting images to coloring book pages for the children in your life! Or even for YOU! Happy Coloring! 🙂
by Sandy McCauley | Apr 20, 2010 | Free Videos, Rhinestones, Welding

Need a quick balanced rhinestone fill option? Check out the newest method I found for filling images in KNK Studio with circles. It involves using the Array function to create a pattern of horizontal lines through your image:

Move the image to the top of the lines. Select both the image and the line array and apply the AND Weld function:

Then another Make Path is applied, a circle added and the usual Transform>Fit Object to Path, results in the pink pattern shown at the top right of this post.
Other options are available. For example, I could have angled the lines or even made them vertical versus horizontal:

And this would have resulted in a different overall look as shown in the image in the middle. At this point, I could even borrow one part from image and combined it with another part from the other image, producing the fill pattern shown at the far right. As always… many options!

As usual, I have a video for those who want detail! Enjoy! Note that this method also works well filling letters.
Filling Rhinestone Patterns Using the AND Weld


