Thanks to Sharon M for today’s topic about converting a paper piecing project into a coloring book image. It’s very simple to do and it only took a few steps to show the basic procedure:
However, there were a few things that were a little different about Sharon’s project so it provided an opportunity to cover a few more features in the software, specifically how to weld some of the individual pieces before using the Thick Line Attribute. And also how to die cut one image from another. Both of these have been covered in previous posts, however this project gave new applications.
As usual, as I’m typing this now, I realize that I forgot one of the important tips when recording today’s video. UGH!!! When you have completed your coloring book image, you may wish to save it as a PDF file OR even convert it to a JPG or BMP. For PDF, just go to File>Publish to PDF. Remember to uncheck the box which forbids printing:

Whether or not you choose to forbid editing is entirely up to you. : ) You will need to select a password if you do choose that option.
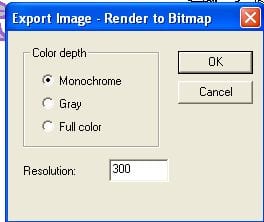
If you wish to export as a JPG or BMP, select the image first, then go to File>Export image and you can select Monochrome since it will be a black and white image. Normally, 300 is the standard resolution used in digital images, so I would recommend leaving that at 300.

Of course, if you are doing this with a colored image, then leave the Full Color option checked.
The last step will be to name your exported image, select a location on your computer to save it, and then you have your choice of five raster formats: .bmp, jpg, .pcx, .png, or.tif.
So, have fun converting images to coloring book pages for the children in your life! Or even for YOU! Happy Coloring! 🙂


