by Sandy McCauley | Dec 3, 2016 | Christmas, Free Files, Free Videos, MTC, PCS, Popup Cards

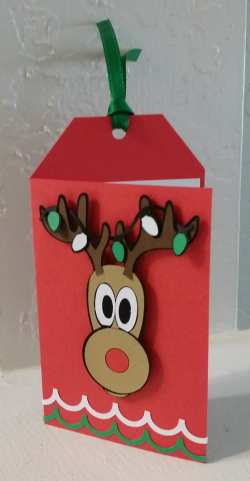
I love Popup Card Studio SOOOO much that after signing up for a Christmas-themed gift tag swap, I immediately decided to design a gift tag that would also be a popup card:

I wanted a whimsical design and easily located a free Rudolph image using Google and traced it in MTC. I employed my usual approach of starting the design in MTC where it always seems easier to visualize the final product. I used a free font called Christmas Light Indoor for the To and From elements. Then I copied and pasted those into Popup Card Studio and created the popup design for the inside of the tag. I exported this popup as an SVG file to reopen in MTC. It’s important to note that if you are a KNK Force owner, you need to do this so that the fold lines can be broken and rejoined before the file is exported and opened in C3 for cutting to the Force.
I used both the Maxx Air and the Force to cut all parts. Because the Force has easy and accurate PNC, I used it for the colored To/From pieces and for the Merry Christmas greeting. I also used it for the popup insert because the Force has dual heads, thus capable of scoring and cutting the popup all in one step. Given that I was making 16 of these tags, I needed efficiency!
While the Force was doing its cuts, the Maxx Air handled the cutting of 16 sets of red, white, green, light brown, dark brown, and black pieces used in these tags. Now, if only KNK USA would come up with a machine to do all of that tedious gluing it took to create Rudolph’s head! LOL When I started organizing the file to share with everyone, it occurred to me that some crafters might like Rudolph to also be a single PNC element so that the tedious gluing of small pieces would be eliminated. No problem! I added several variations to the file that I’m sharing here.
The file contains an MTC format file, a SCAL format file, and individual SVG files for those cutting with the Force or importing into a different program. Also, for those using other design software, the PNC elements have been included as individual PNG files. To verify sizing, the tag should be 4.75″ in height.
If you’re into popup cards, think about buying Popup Card Studio. It takes a little practice maneuvering in the software but there are lots of free videos to help you learn it:
PCS Demo
Intro to PCS
Two Line Card in PCS
and dozens of other PCS videos here: Susan Bluerobot
If you have any questions, please post!
by Sandy McCauley | Jan 26, 2015 | Boolean Join, Eraser, Free Files, Free Videos, Hearts - Designing, Jigsaw Puzzle Generator, MTC, Shadow

Long time, no post! Hopefully today’s topic on designing a custom shaped jigsaw puzzle will help make up for my absence!
There are a number of different methods for combining a puzzle from MTC’s Puzzle Generator with any shape to create a custom-shaped puzzle like the one shown above. Other MTC owners have posted their methods, including Bryan Williams in one of MTC’s Tuesday night webinars. His method and mine are virtually identical other than how we edit the puzzle to remove extra lines. Anyhow, here’s a link to the new video I made:
Designing a Heart Shaped Puzzle
This is a great exercise in learning two of MTC’s most valuable functions: Boolean Join and the Inverse Eraser.
Then, if you haven’t used the Puzzle Generator, then you might also need this video:
MTC Puzzle Generator
Finally, the heart I created is also available in case it’s something you can use in one of your upcoming Valentine’s projects:
Free Puzzle Heart Files:
KNK Format
MTC Format
PDF Format
Finally, if you do not yet own MTC, it can be purchased for only $57.99 at this link. Let me know if you have any questions!
by Sandy McCauley | Aug 28, 2013 | Free Files, Free Videos, Make The Cut, Measure Tools, Metric, MTC

Make The Cut wasn’t originally targeted for anyone living outside the United States. It was a basic vector program written by a brilliant guy for his wife who owned a Cricut and happened to scrapbook! Fast forward a few years and now Make The Cut is owned and used by thousands of customers around the world who are still attracted to its simplicity but also hooked on its functionality. Not only does it have easy-to-learn auto-tracing functions which rival those of far more expensive programs, but some of its other features are just plain COOL to use! I’ve covered a lot of these in other prior posts here. Just look up MTC in the Category feature on the left column here.
The main problem for the non-US owners is the inability to easily work in metric. The main display for shape dimensions and location remain in inches. It’s my understanding that adding a metric version would require a huge re-write and that’s not on the table right now. So, last spring a member of the MTC forum (Lesly Holliday) came out with a handy template file that had ruler shapes and a grid drawn to metric dimensions. For the past few months, I thought about what if anything might still pose a problem when using this file. I came up with some modifications and decided to start from scratch by designing longer rulers to reach the full 12″ boundaries of the KNK Zing mat and also put the rulers and the grid on their own page for several reasons which I’ve covered in detail in a video linked below.
Before we get to the metric mat template and video, note that there are several existing metric workarounds already present in MTC:
(1) The dimensions of a shape can be entered in either cm or mm in the W: and H: fields by simply adding the units after the values. For example to re-size a shape to be 15 mm wide, enter the value like this:

(2) While the display will convert the sizing to inches, the dimension can be verified by using the Measure tool under the Node Edit menu. I’ve previously made a video on using this feature after being contacted by someone cutting rhinestone templates which are, traditionally, designed in metric:
Determining shape dimensions in metric units
(3) Newer features in MTC have metric options already. For example, if you are shadowing a shape, doing nested duplication, drawing with the Fat Path opton, or using the Erase Tool. All of these will either require values to be entered in mm or give you the option of in, cm, or mm.
Now, back to the metric template, download the file from here and open it in Make The Cut. You’ll see that metric rulers and a metric grid have been set up on their own page and the file is ready to use. You might want to immediately save under a new name so that you can preserve the original. Now you’re ready to watch the video where I explain how best to use this file:
Using the Metric Mat Template File
Be sure to note how you can switch between Portrait and Landscape, why you might want to set up a Tiny Mat, and why it’s important to leave the metric rulers and grid on their own separate page. Most importantly, please provide suggestions using the Comments section below for any enhancements which might make this metric template more usable for your needs! 🙂
by Sandy McCauley | Apr 9, 2012 | Eraser, Free Files, Free Videos, Ginsu Knife, Inline, Inset Shadow, KNK, Make The Cut

Carol B contacted me asking for help with designing what I’m going to call a “shaped inset”. The original file was a onesie-shaped greeting card and she wanted to have a separate shape cut that would contain text for the inside of the card. She wanted it to be the same shape as the card but smaller so that there would be an even border or margin around the smaller shape, as shown in the screenshot above. Conveniently, I had another similar onesie file that I had designed several years ago, so I used it for experimenting and for making the videos for today’s post.
Since Carol was asking me how to do it in EITHER KNK Studio or Make The Cut, I decided to show how to do it in both programs since it is equally easy in both programs! In KNK Studio, I used the Ginsu Knife tool to bisect the card, followed by the Inline function under Transform>Outline to shrink the shape. This created a nice even border to appear around the smaller onesie shape. In Make The Cut, you will use the Erase tool to bisect the card, followed by the Inset Shadow function under the Shadow Layer to shrink the image, creating the same kind of border or margin.
Here are the links to the two videos:
Creating an Inset Shape from a Shaped Greeting Card in KNK Studio
Creating an Inset Shape from a Shaped Greeting Card in Make The Cut
If you want to follow along during the video and repeat exactly what you see, then the file I used can be downloaded here:
Onesie in KNK Format
Onesie in MTC Format
by Sandy McCauley | Dec 17, 2011 | Christmas, Free Files, Team KNK

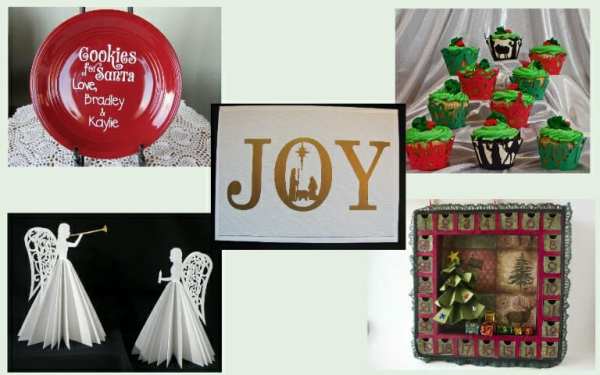
Team KNK is back on line again! Be sure to check out the LATEST KNK projects above! Here are some direct links to these projects:
Advent Calendar by Deb
Christmas Cupcake Wrappers by Judy
Paper Angels by Judy
Santa Plate and Joy Card by Nancy
Be sure to check Team KNK every day in the following week! To catch up on our absence, we will be posting a new project EVERY single day!
I want to thank all of the Team KNK designers for their beautiful and creative projects this year. I look forward to working with the team throughout 2012 as we provide more inspiration for the readers of our Team KNK web site!
by Sandy McCauley | Oct 15, 2011 | Free Files

Congratulations to Visual Designs by Chris and her team of designers! They are celebrating three years of providing cutting files to all of you wonderful customers creating magic with your machines!
To celebrate this 3rd Anniversary of www.visualdesignsbychris.com, I am offering a $25 gift certificate to www.knkusa.com AND Chris is donating a Qmc “The Gift” which is a set of 15 cutting files focused on gifts you can give for this holiday season or throughout the year:

Here are a few project ideas using files from this membership:


The winner will be selected randomly from those who post a comment HERE to THIS post today. Note that I will need to approve the posts and will do so as quickly as I see them. As long as your post makes it to my approval section by midnight PDT, it will qualify. I will then draw the name of the winner Sunday and announce in a new post! Good luck to all!
And don’t forget to then head over to VDBC to see the adorable cutting files available by Chris and her designers. Also, click on the Forum there to join in on more celebrations this weekend!
Happy Anniversary, VDBC!


