by Sandy McCauley | Jun 8, 2012 | Decorative Edge Card, Designing, Free Videos, KNK, Make The Cut, MTC, Stenciling

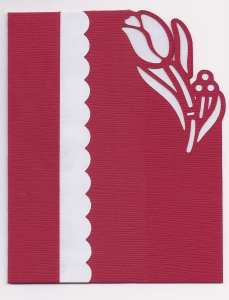
Free videos today to teach you how to make a stencil-edged card, such as the one I made above. There are other variations on this card and I want to thank the various members of the MTC Forum who shared their ideas. I liked Liz Ackerman’s because I immediately saw how it would work in KNK Studio, as well. So, that’s why my readers get TWO videos today… one showing how to design a stencil edge in KNK Studio and one showing how to design the same exact thing in Make-The-Cut.
Designing a Stencil Edged Card in KNK Studio
Designing a Stencil Edged Card in Make The Cut
If you would like to download the cutting files for this design, select the file type format you need:
Stencil Edge Tulip Card in KNK Format
Stencil Edge Tulip Card in MTC Format
Stencil Edge Tulip Card in PDF Format
Post if you have any questions!
by Sandy McCauley | May 8, 2012 | Auto-Tracing, Free Videos, Importing, Make The Cut, MTC
It’s been months and months since I posted about the 25 reasons to look into buying Make-The-Cut (MTC). Thus today, I’m catching up a bit by posting more reasons, all of them related to the auto-tracing functionality and why I prefer it over that in KNK or ACS Studio… or, for that matter, any of the other vector programs I’ve tried. This is one of the major reasons a lot of cutter owners have chosen Make-The-Cut and I have to tell you, in two simple words, “It Rocks!”
We last left off with #12 in my countdown to 25… which now will probably extend to 30 since I’ve had time to explore and discover more cool functionality available in MTC. So, we start the numbering of these seven new reasons with #13. Note that I also made a demo video to cover these 7 reasons, in case you prefer to just watch versus read! Also, there are additional details on the Pixel Trace function in the MTC user manuals here at this site, as well as in my free MTC training videos covering tracing.
Reason #13: Single Icon Access
In MTC, you only have to remember one location to activate the tracing, whether you are importing an image already saved as a file on your computer, scanning an image directly into MTC, or pasting an image that has been copied to your Windows Clipboard. The Pixel Trace function is located on a toolbar at the top of the MTC screen, easily accessible. If you prefer shortcut keys, then Ctrl+Shift+T will also activate Pixel Trace. Or you can activate in the File>Import menu. But again, what I like is that one window opens with three options available, as shown below:

My favorite method for finding images is to Google what I’m needing, click on “Images” on the left side of my browser window, click on an image I want, right click to select Copy, and then paste that image into MTC using Option 3 above. It doesn’t get any faster than that!
Reason #14: Preview of Results Before Accepting
After clicking on Open in the window above, I see the next reason I prefer to use MTC over KNK Studio: immediately the tracing I will get with the default settings appears. The blue lines show the path being traced while the green fill indicates what would be cut out using these settings. To the left, in black, I can also see the trace results, using the current settings, on the main MTC screen:

Further, as I modify settings to refine the trace, I can continue to see the effects of these settings without accepting the results. While this is standard in many vector programs, it is still the case, in KNK and ACS Studio, where you must accept each change in settings, leave the tracing functions, and move the original image away from the trace, before being able to see the results of that trace! Talk about tedious!
So, in this example, if I reduce the Threshold and increase the Resample in order to capture more detail of the flower, I can see the effects before accepting:

Reason #15: Viewing Settings
There are three settings which do not affect the trace in any way, but can be quite handy. First off, there is an Alpha setting which changes the visibility of the original graphic. Scroll to the far left and none of the original image shows and the user can better see exactly what will be cut. Scroll to the far right and more of the original graphic is visible in order to better see the fit of the trace lines around and within the image:

There is a Zoom function so that the user can zoom in on specific spots on the image to check the tracing. There is also a box to mark if the user wishes to view the nodes that would be produced with the current settings:

Reason #16:Useful Info about Imported Image and Traced Image
The lower left section of the Pixel Trace screen contains information about the original imported graphic, as well as the tracing itself:

The most useful data for me is noting the number of nodes and then the number of shapes. If there are thousands of nodes, then the file will take longer to cut. To reduce the nodes, the Resample setting should be decreased. If there are numerous shapes then I know I should increase the Despeckle to filter out tiny paths that are not necessary to my cut.
Reason #17:Texturize and Blackout Options
There are two typical situations in which I’m using the Pixel Trace function: (1) I need just a quick die cut shape or possibly a paper piecing of an image and (2) I want to perform a print and cut in which the original image will first be printed to my home printer and then my KNK will cut it out. In the second situation, I will typically be needing the original graphic to be imported and I only need the outside of the image traced. This is where the Texturize and Blackout options are useful.
The original graphic will not be imported unless the Texturize box is checked. Note how the original image now appears inside the tracing lines, to the left, in the main screen:

The Blackout option is used to delete any interior (child) paths contained within a larger path. Now, in this particular example, applying Blackout would delete the interior parts from being cut, which may or may not be wanted. But the nice thing is that the option to do this is there, if needed. Note that if you forget to do it, there’s a second Blackout tool on the Magic toolbar at the bottom:

Reason #18:Separate Tracing Option for Images with a Transparent Background
Images with transparent backgrounds can be more difficult to trace using the standard method in MTC. In the following example, a PNG file has been imported for a print and cut application. The default threshold is far from acceptable and even increasing it up to 200 still fails to complete trace this big cat! It was necessary to increase it up to 250 to get the best tracing:

But not to fret! Simply click on the Alpha tab and often the Default setting for the Threshold will give much closer desired results:

How does one know when to use this tab? Again, it’s applicable with files having transparent backgrounds, as found with many PNG files and especially when there are pale colors (such as yellow, gray, and white) next to the background.
Reason #19:Two Color Tracing Options
Most vector programs now have the option to provide color tracing, as well as monochrome tracing. But the uniqueness of MTC is that you have TWO separate color tracing options AND the ability to employ both of them, as well as the regular monochrome tracing, all during the same trace! Trace any part of your image, import it, and when asked if you want to trace more layers, answer, “Yes.” You can then stay with the same tracing option or click on another tab to use another tracing option! VERY cool!
Now this probably isn’t necessary for the majority of the tracings being done, but as I tell my students, “When tracing, you never really know what you’re going to need!”
The two colored options are the other two tabs in the Pixel Trace window, labelled “Palette” and “Color”. First let’s look at Palette in which the 16 most prevalent colors are identified and users can choose to select one or more at a time to be traced. In the following example I show two situations. In the first, only two of the four pink colors are marked. The pixels closest to those two colors are selected to be incorporated in the trace. In the second, all four pink colors are marked, resulting in more of the flowers being traced. Note how this results in a merging, of sorts, so that larger paths, incorporating more of the image, are created:

The Color tab allows one to use an eyedropper tool to move around the original image and then click to select a color to use in the tracing. The Tolerance setting is adjusted to then select how much of a similar color to include in the tracing. Below, the lighter pink is selected, but note the difference in what gets traced based on the whether the Tolerance is left at the default of 5 versus being lowered to 3:

Once the pink layer is imported, another color is then selected using the same eyedropper tool and then the Tolerance adjusted. Again, you can continue using this same Color method or switch to the Palette method! Either could be used for the black background OR the original Pixel tab could be employed instead. Or one could even use the Shadow function after leaving the trace window to create a background option! So many choices… so much fun!
Below are the results of the Palette trace and the Color trace, along with the original image… in some order? Can you tell which is which?

Make-The-Cut sells for $58.36 and will cut to a wide range of cutters, including the majority of the KNK models. Feel free to email me if you have any questions about using it with your particular cutter.
by Sandy McCauley | Apr 9, 2012 | Eraser, Free Files, Free Videos, Ginsu Knife, Inline, Inset Shadow, KNK, Make The Cut

Carol B contacted me asking for help with designing what I’m going to call a “shaped inset”. The original file was a onesie-shaped greeting card and she wanted to have a separate shape cut that would contain text for the inside of the card. She wanted it to be the same shape as the card but smaller so that there would be an even border or margin around the smaller shape, as shown in the screenshot above. Conveniently, I had another similar onesie file that I had designed several years ago, so I used it for experimenting and for making the videos for today’s post.
Since Carol was asking me how to do it in EITHER KNK Studio or Make The Cut, I decided to show how to do it in both programs since it is equally easy in both programs! In KNK Studio, I used the Ginsu Knife tool to bisect the card, followed by the Inline function under Transform>Outline to shrink the shape. This created a nice even border to appear around the smaller onesie shape. In Make The Cut, you will use the Erase tool to bisect the card, followed by the Inset Shadow function under the Shadow Layer to shrink the image, creating the same kind of border or margin.
Here are the links to the two videos:
Creating an Inset Shape from a Shaped Greeting Card in KNK Studio
Creating an Inset Shape from a Shaped Greeting Card in Make The Cut
If you want to follow along during the video and repeat exactly what you see, then the file I used can be downloaded here:
Onesie in KNK Format
Onesie in MTC Format
by Sandy McCauley | Sep 23, 2011 | Free Videos, Hot Keys, Layers Menu, Make The Cut, MTC, Rhinestones, Shortcuts, Thin Paths, Uncategorized

Oops! Been a while since I posted about Make-The-Cut! Now that the Denver Retreat is complete and I’ve had a chance to catch up on the umpteen To Do items that were postponed because of the retreat, I can now get back to this site and the 25 reasons to check out MTC! Now that Andy has released a new beta 4.0 of MTC, the list is growing, so expect it to be at least 30 reasons by the time I have the MTC User Manual completed and our new Zing is released!
But first… I have a hot key list for MTC now ready to share. This will go into the user manual, but since it’s mostly complete, I wanted to go ahead and make it available to all of my readers. Here’s the link:
MTC Shortcut Keys
And now for three more reasons to check out MTC:
Reason #10 Rhinestone Feature
MTC’s Rhinestone window provides an automatic way to outline your vector shapes or do a horizontal fill using the circle size you choose, along with the spacing. Additionally you can preview the results before accepting and also see the circle count in this same window:
Video of Rhinestone Feature in MTC
Regarding the tweaking of the designs, MTC has short cut keys set up for top (T), bottom (B), right (R) and left (L) alignment, as well as equal vertical ([) and equal horizontal (]) spacing. I also really like the new Esc hotkey to unselect all images.
Reason #11 Path Thinning

Path thinning is the same thing as Center Line Tracing in KNK Studio and other vector programs. It converts a thick line shape into a single line, such as shown above in the image of the glasses. This can greatly simplify some rhinestone designs, especially lettering, as shown in the video below. It can also be handy when pens or markers are going to be used for drawing images and/or lettering.
Thin Paths Feature in MTC
Reason #12 The Font Name Is Automatically Listed in the Layers List
How many times do we forget the name of the font we used in a design? Well, MTC has a solution for that! When you type new text, the name of the font will be assigned as the name of the layer! This was a brilliant feature to include in a program that is used by those who love to collect the thousands of free fonts available on the Internet!
Click on the image to see the fonts names that were assigned for each text I typed:

Speaking of collecting fonts, here are some of my favorite sites to grab free fonts:
http://www.dafont.com/
http://dingbatdepot.com/
http://www.urbanfonts.com/
http://simplythebest.net/fonts/
http://www.acidfonts.com/
If you’re ready to take the plunge to Make-The-Cut, here’s the link to MTC in my own store:
https://iloveknk.com/products-page-2/make-the-cut/
You will receive an activation pin for registering MTC and your registration number will work for all of your computers. Other videos for MTC are now available at this link:
MTC Support
And the first detailed on-line User Manual will be available within about 3 – 4 weeks!
by Sandy McCauley | Aug 16, 2011 | Conical Warp, Cupcake Wrapper, Free Files, Free Videos, Jigsaw Puzzle Generator, Lattice, Make The Cut, MTC, Tumbler Wrap

Lattice, Jigsaw Puzzle Generator, and Conical Warp
In my continuing series of 25 reasons to check out MTC, I have quite a show for you today! Three features in Make The Cut provide some out-of-the ordinary designing functions that may be of interest to many of you. I’ve made videos for all of them and I encourage you to download the trial version of MTC and play along! So, getting started….
Reason #7: Lattice Feature
This simple-to-use feature involves selecting your shape and then clicking on the Lattice icon on the Magic Toolbar. The following window opens and you can begin playing with the various settings:

As with most other features in Make The Cut, you can see what you’re creating before accepting those settings. In the video, I encourage you to go to the extremes with these settings so you can fully grasp the range of different looks you can achieve with your lattice. I also explain the difference between the regular and the inverse lattice, the latter of the two being the most commonly used in my experience of helping KNK customers in their designing. Note that preferred settings can be saved to apply to future shapes.
Video: Using The Lattice Function
Reason #8: Jigsaw Puzzle Generator
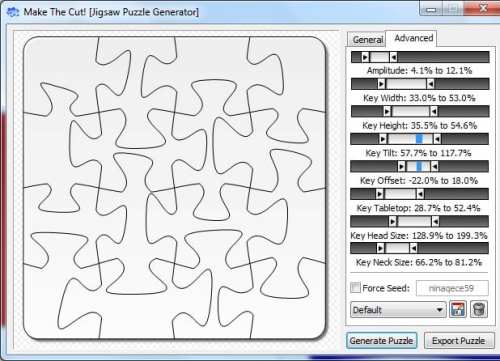
The MTC Jigsaw Puzzle Generator launches as a separate program. First, make sure you have installed Version 3.3.3 of MTC and then click on your Windows start button, select All Programs, and locate your Make The Cut folder. You should find the Jigsaw Puzzle Generator located there and ready to be selected.
Once again, we have a simple-to-use application where you can create a jigsaw puzzle with the options to:
Set the overall dimensions of the puzzle (i.e., width and height)
Set the row and column numbers of pieces you want, such as 4 x 4 for 16 pieces, 4 x 9 for 36 pieces or even 20 x 50 for 1000 pieces!
Round the four corner pieces of the puzzle from 0% to 100%


Just like with the Lattice feature, settings can be saved for future use. And don’t worry… if you mess up those advanced settings and want to return to the defaults, just close the Jigsaw Puzzle Generator and reopen!
To then use your jigsaw puzzle design in MTC, you click on the Export Puzzle button, save the design as an SVG file, and then import into MTC. Note that the design can the be resized, if necessary, for your application.
To see how I used the Jigsaw Puzzle Generator to set up a print and cut application in MTC, watch this video:
Video: Jigsaw Puzzle Generator
Reason #9: Conical Warp
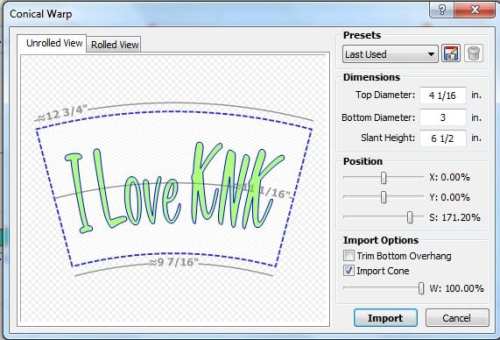
Last but definitely NOT least, have a look at the conical warp feature, which is a new addition to the latest free update of MTC. It was added with two specific designing applications in mind – tumbler wraps and cupcake wrappers. The basic settings involve entering the top and bottom diameters of the object you are wanting to fit your images/lettering to, along with the height of your object. Further, there are settings for shifting your object’s location on the wrap and even resizing (scaling) without returning to the main window:

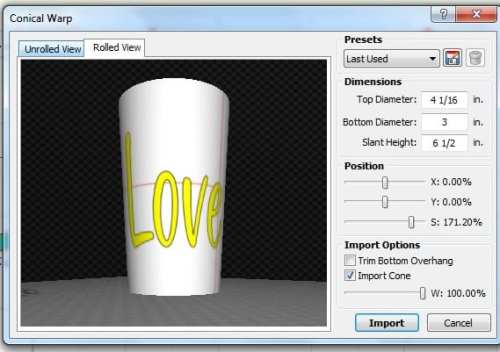
But then… wow oh wow… have a look at what happens when you click on the Rolled View tab:

You get an advanced 3D look at the wrap you’re designing! Further you can still tweak settings in this view and observe the changes! (A personal note to Andy – you outdid yourself on this one, dude!!!) To see in detail how to use the conical warp, watch this video:
Video: Conical Warp for Tumbler Wrap Designing
And if you’re into cupcake wrapper designing, then grab Judy Keating’s cupcake wrapper template file, open that up in MTC and then watch my video on how I combined the conical warp feature with her wrapper template and easily created a cupcake wrapper!
Video: Conical Warp for Cupcake Wrapper Designing
Finally… warp versus wrap? Yep… two different words! And in all likelihood, I probably got mixed up somewhere in those videos and said “conical wrap” and “tumbler warp!” lol But you know what I meant!
Stay tuned for more of the list soon. Again, if you’re interested in purchasing Make The Cut, it’s sold for $58.36 under my Shop tab above.
by Sandy McCauley | Aug 8, 2011 | AI Files, Converting File Formats, Free Files, Free Videos, Importing, KNK, Make The Cut, MTC, Notes, Videos, Zing
Ready for some more Make The Cut! (MTC) features? Here are three more all related to having more files available and how easy it is to get them into MTC for cutting:
Reason #4: Make The Cut! will import SVG files and several other formats not available for import into KNK Studio.
SVG files are readily available on the Internet, both from web stores selling cutting files but also free at many blogs and user forums. MTC will also import SCUT files (created in Sure Cuts A Lot) and the latest AI formats. While KNK Studio does offer a wide range of file import filters, unfortunately SVG and SCUT are not included. Further, AI files must be version 8 in order to easily edited. Newer versions of AI can be troublesome in KNK, but not in MTC!
It’s very simple to import SVG files: just look for the icon at the top of the screen:

Reason #5: Make The Cut! comes with over 4500 free cutting files uploaded by users!
It’s a simple click to bring up a search window where you can not only search by category, date, and tag word, but also by an ID indicating which user uploaded the file! Further, this is a growing database as more and more MTC owners freely share their designs with other owners. Here’s a video to see how this works:
MTC On-Line Gallery
Reason #6: You can copy and paste images, text, and notes directly from KNK Studio to Make The Cut!
This one is extremely important because the new KNK Zing will come with Make The Cut! software and I know that KNK owners will want to be able to cut their existing .knk files as well as continue using KNK Studio for some of the designing functions they’ve already been using for years. No problem! The copy and paste is very simple to do.
I was especially happy to see that you can also continue using those 1300 fonts that came on your KNK Clipart and Fonts CD and copy/paste text you’ve just typed directly over to MTC, even though MTC cannot install these particular font formats. Further, if you use the Notes function in KNK Studio, you can also copy/paste this text into a similar Notes function in MTC.
Here’s a video showing how easily these three copy/paste situations work:
Converting From .KNK to .MTC
Make The Cut! uses a layers function to separate images for cutting. This would be used any time you have different colors in a KNK file and specifically need to keep those colors separated fur cutting. For example, a fold-up project with scoring lines could be one instance in which you would want some parts of an image put into a different layer from the rest. Another would be a paper piecing project where one would put all of the images to be cut from each color of cardstock onto separate layers. There could be several ways to do this when converting from KNK to MTC, but here’s my initial recommended method:
Converting A Multi-Color KNK File to MTC
Thanks for reading! Be sure to check out my next post in a few days when I’ll present three designing features in Make The Cut! that will make you cry out, “Wow!”
MTC is sold for $58.36 in my store.
