by Sandy McCauley | Aug 2, 2011 | Character Map, Dingbat Fonts, Font Installation, Free Videos, Make The Cut, MTC, Text To Graphics

Today begins a topic that I’ll be covering off and on over the next month or so, to present 25 Reasons to have a look at a software program called Make The Cut! These reasons are basically features that are either not present in KNK Studio OR work a lot more easily in MTC compared to KNK. While this is mostly targeted towards those who are already using KNK Studio, the information provided, along with free videos, could also benefit anyone who is interested in MTC or just now learning to use it.
So, time to get started! Note that these 25 items are not in any particular order… but will be grouped into topic areas, such today… three reasons all related to text.
Reason #1: In MTC, you can open up and use a TTF font that is not already installed in Windows.
KNK owners know that to temporarily install a font, you need to first temporarily install it in Windows, using any of several methods, but then the font must also be installed into KNK Studio separately. In MTC, you can click on a button and then browse any folder on your computer to locate a font to import into the font menu and then use it while you have MTC open. Upon closing MTC, that font will be automatically uninstalled. Videos showing how this works in both programs are linked below, after I mention the next reason.
Reason #2: In MTC, your typed text doesn’t have to be changed in any way before saving the file and sharing with someone else.
In KNK Studio, if you forget to convert your text to a graphic, then someone else opening that file will not be able to view the text that you originally created unless they happen to have the exact same font installed.
To see the steps required in these two programs to accomplish the same thing, watch these videos:
Temporarily Installing Fonts in KNK Studio
Temporarily Installing Fonts in MTC
Reason #3: In MTC you can easily increase the preview image sizes of dingbat fonts whereas in KNK Studio, the image sizes are fixed in the Character Picker function. The best way to fully understand this difference is to watch the two videos. I really like being able to clearly see each image before selecting.
Using Character Picker in KNK Studio
Increasing Preview Sizes of Dingbat Fonts in MTC
More reasons and more videos to come in the near future! Post if you have questions. And note that I sell Make The Cut! at this link: Make The Cut! Software
by Sandy McCauley | Mar 3, 2011 | Array, Free Videos, Multiples, Repeats

Thanks to Stacey and Jennifer for asking this question within 24 hours of one another! What’s the easiest way to cut multiples of the same image?
Well, you actually have two choices and both are described in the KNK User Manual in Section 3.5. But, as usual, a picture is worth a thousand words and a video is worth 10,000! So, instead of reading the 391 words I wrote on this topic in the KNK User Manual, try watching these two videos, which cover the topic in MUCH more detail and provide you some extra tips, as well!
Creating Multiples Using the Array Function
Creating Multiples Using the Repeats Function
by Sandy McCauley | Feb 18, 2011 | Connect Path, Fold-Up Projects, Free Videos, PDF, Pouncing

Okay, so this is a little late for Valentine’s Day, but I didn’t receive the question from Clare until Tuesday morning! : )
Clare is a new KNK Maxx owner and was having some problems with a free PDF file she had downloaded from a great web site that I’m sure you ALL are going to be checking out:
PaperCraft Art Creative Downloads
This file is a perfect example to show how to import vector PDF pattern files into KNK Studio and prepare them for cutting. So, I made a series of videos to show the four major steps in getting the file ready to cut:
The first step is to import the vector file (after it is downloaded and saved to your computer). For many PDF files, you use the same steps as when importing AI files. You need to assign a color for the Fill, if it imports with invisible Fill and you need to turn off Thick Line Attribute. Now that won’t be necessary with ALL PDF files, but just in case, watch this video:
Importing Vector PDF with Invisible Fill and Thick Line Attribute
Once those steps are completed, the lines need to be recolored. This is normally just a matter of selecting one or more paths at a time and then picking colors from the Shop Palette to distinguish fold lines from cut lines. In this particular example, there are a few spots that needed correcting and, thus again, this particular file is a great example to show what you might need to do with an imported pattern file. Make sure to test cut first from scraps just to make sure you understand how the pattern will fold and if there are any problem areas needing alteration:
Recoloring Lines in Fold Up Patterns
Then, you’ll need to decide if you want to score those fold line or convert them for dashed/perforated cutting. I’ve covered both options in the next video:
Scoring and Pouncing
Finally, before cutting the pattern, I will check to see if the various lines and curves making up the design are many individual segments or connected into one or only several paths. While it’s not essential to make them one continuous path, you will probably get a better cut if they are. It can take a lot longer to cut if the machine is lifting and dropping the blade for individual line segments, especially if you haven’t set the cut order. Also, it may lead to more spots where the cutting isn’t smooth. So, in this final video I show how to use the Connect Path function in the software to join up all of those lines. Now, one could also just manually join the adjacent nodes on any two paths, but in this case there are a LOT of individual segments. So, when the nodes are close together, this one step function will join all of them. Nice! Oh… and I also show how to create the separate heart halves to cut from a second color, as shown in the box I cut above. : )
Connecting Paths
Finally, I have an older video on resizing boxes. Note that you can normally just drag the corner on a selected pattern and resize proportionately and you should be fine. However, when you want to stretch the pattern in one direction, more than in the other, then watch out! Your fold-up pattern may no longer work! So, a revisit of this blog post and video will help you in such situations.
Post about Resizing Boxes
Resizing Boxes
Thanks, Clare for providing the topic for this post! Good luck with learning your new Maxx! Let me know if you have more questions.
by Sandy McCauley | Jan 14, 2011 | Designing, Free Videos, Making Path, Outlining Images, Paper Piecing, Welding

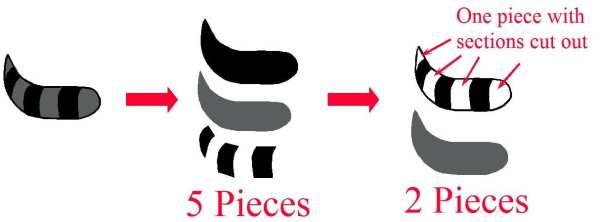
My friend, Susan Mast, sent me an image she was tracing to create the card above. She was stuck on the raccoon’s tail. She had it designed so that there were 5 individual pieces, but what she wanted was just two pieces… a solid gray piece and then a black overlay piece with sections cut out. This makes a lot of sense, especially when designs have many smaller interior paths that would require an insane amount of arranging and gluing.

So, as usual, a picture is worth a thousand words and a video is worth ten thousand! lol So, here’s the video to show you how I took Susan’s tracing of the tail and then turned it into the paper piecing she wanted. Note that this example is a little more complicated than most because we needed to do what I call a die cut weld, in order to get the individual pieces first. Thus, in many situations, you would be starting with just an image with lots of little parts and then creating the cut-out overlay and the slightly shrunken background piece.
Simplifying a Paper Piecing
A big thanks to Susan for allowing me to use her question for today’s post! If you happen to live in Arizona, note that Susan teaches card and mini-album classes at Scrapbooks, Etc in Mesa. Her classes are always so much fun with adorable projects to make! You can also visit her web site and blog to see more of her adorable work.
by Sandy McCauley | Oct 25, 2010 | Free Videos, Reducing Nodes

Congratulations to Lori G on the launch of her web site, www.studioalohadesigns.com, selling her beautiful cutting files in .knk, .svg, and .gsd formats!
Lori contacted me a few weeks ago about the best way to reduce nodes in the file shown above. As all of the file designers know, it’s not critical having a lot of nodes in a KNK file as it will cut quickly and smoothly to digital die cutters. However, a file with hundreds of nodes is NOT handled nearly as well when cutting to a Cricut, Silhouette, Wishblade, or Craft Robo. So, I showed Lori, in a video, how I would handle reducing the nodes in this file and then decided the video I made should be posted to my blog and shared with all of you! Even if you’re not a file designer, you could be creating files that you’d like to share with your friends or family members who own the other cutters mentioned above. So, take note of how nodes can be eliminated without compromising the file itself.
Here’s a link to the video: Reducing Nodes
I wish Lori the very best with her new Internet store!
by Sandy McCauley | Sep 24, 2010 | Character Map, Free Videos, Greek Alphabet

Today’s post is in response to a question at the Klic-N-Kut Yahoo group. Karen C asked about a source for Greek letters. Piece of cake! All you need to do is select Times New Roman as your font and use the Character Picker function to locate the Greek alphabet that’s available within this font. Here’s a quickie video to show you the steps:
Finding Greek Alphabet Characters in KNK and ACS Studio


