3 “WOW” Make The Cut Features!
In my continuing series of 25 reasons to check out MTC, I have quite a show for you today! Three features in Make The Cut provide some out-of-the ordinary designing functions that may be of interest to many of you. I’ve made videos for all of them and I encourage you to download the trial version of MTC and play along! So, getting started….
Reason #7: Lattice Feature
This simple-to-use feature involves selecting your shape and then clicking on the Lattice icon on the Magic Toolbar. The following window opens and you can begin playing with the various settings:

As with most other features in Make The Cut, you can see what you’re creating before accepting those settings. In the video, I encourage you to go to the extremes with these settings so you can fully grasp the range of different looks you can achieve with your lattice. I also explain the difference between the regular and the inverse lattice, the latter of the two being the most commonly used in my experience of helping KNK customers in their designing. Note that preferred settings can be saved to apply to future shapes.
Reason #8: Jigsaw Puzzle Generator
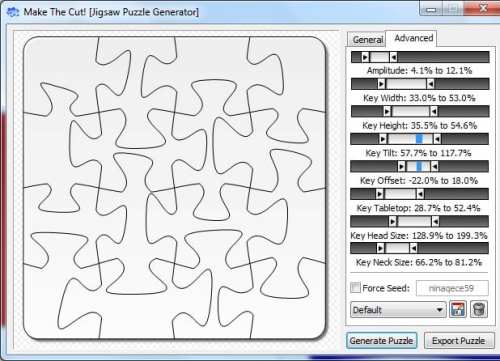
The MTC Jigsaw Puzzle Generator launches as a separate program. First, make sure you have installed Version 3.3.3 of MTC and then click on your Windows start button, select All Programs, and locate your Make The Cut folder. You should find the Jigsaw Puzzle Generator located there and ready to be selected.
Once again, we have a simple-to-use application where you can create a jigsaw puzzle with the options to:


Just like with the Lattice feature, settings can be saved for future use. And don’t worry… if you mess up those advanced settings and want to return to the defaults, just close the Jigsaw Puzzle Generator and reopen!
To then use your jigsaw puzzle design in MTC, you click on the Export Puzzle button, save the design as an SVG file, and then import into MTC. Note that the design can the be resized, if necessary, for your application.
To see how I used the Jigsaw Puzzle Generator to set up a print and cut application in MTC, watch this video:
Reason #9: Conical Warp
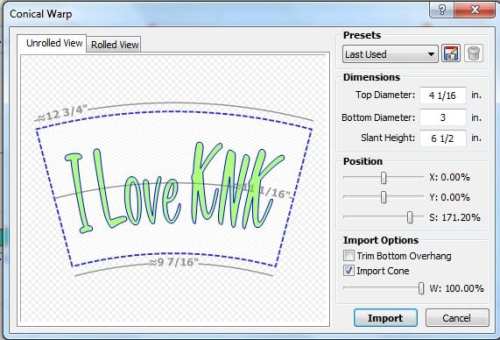
Last but definitely NOT least, have a look at the conical warp feature, which is a new addition to the latest free update of MTC. It was added with two specific designing applications in mind – tumbler wraps and cupcake wrappers. The basic settings involve entering the top and bottom diameters of the object you are wanting to fit your images/lettering to, along with the height of your object. Further, there are settings for shifting your object’s location on the wrap and even resizing (scaling) without returning to the main window:

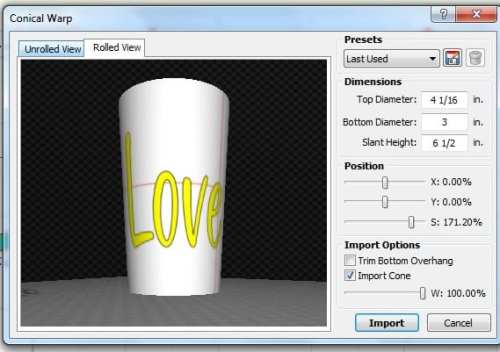
But then… wow oh wow… have a look at what happens when you click on the Rolled View tab:

You get an advanced 3D look at the wrap you’re designing! Further you can still tweak settings in this view and observe the changes! (A personal note to Andy – you outdid yourself on this one, dude!!!) To see in detail how to use the conical warp, watch this video:
And if you’re into cupcake wrapper designing, then grab Judy Keating’s cupcake wrapper template file, open that up in MTC and then watch my video on how I combined the conical warp feature with her wrapper template and easily created a cupcake wrapper!
Finally… warp versus wrap? Yep… two different words! And in all likelihood, I probably got mixed up somewhere in those videos and said “conical wrap” and “tumbler warp!” lol But you know what I meant!
Stay tuned for more of the list soon. Again, if you’re interested in purchasing Make The Cut, it’s sold for $58.36 under my Shop tab above.


