by Sandy McCauley | Apr 23, 2010 | Coloring Book, Free Videos, Line Style, Welding

Thanks to Sharon M for today’s topic about converting a paper piecing project into a coloring book image. It’s very simple to do and it only took a few steps to show the basic procedure:
Creating a Coloring Book Image
However, there were a few things that were a little different about Sharon’s project so it provided an opportunity to cover a few more features in the software, specifically how to weld some of the individual pieces before using the Thick Line Attribute. And also how to die cut one image from another. Both of these have been covered in previous posts, however this project gave new applications.
As usual, as I’m typing this now, I realize that I forgot one of the important tips when recording today’s video. UGH!!! When you have completed your coloring book image, you may wish to save it as a PDF file OR even convert it to a JPG or BMP. For PDF, just go to File>Publish to PDF. Remember to uncheck the box which forbids printing:

Whether or not you choose to forbid editing is entirely up to you. : ) You will need to select a password if you do choose that option.
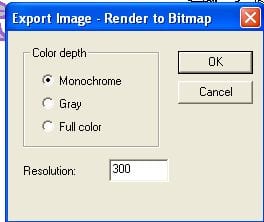
If you wish to export as a JPG or BMP, select the image first, then go to File>Export image and you can select Monochrome since it will be a black and white image. Normally, 300 is the standard resolution used in digital images, so I would recommend leaving that at 300.

Of course, if you are doing this with a colored image, then leave the Full Color option checked.
The last step will be to name your exported image, select a location on your computer to save it, and then you have your choice of five raster formats: .bmp, jpg, .pcx, .png, or.tif.
So, have fun converting images to coloring book pages for the children in your life! Or even for YOU! Happy Coloring! 🙂
by Sandy McCauley | Jan 21, 2010 | Line Style
Linda N contacted me a few days ago and couldn’t figure out why the boxes around her selected image extended all the way down to the Sign Blank border instead of being positioned around her image:

Well, this will always mean that there is MORE selected than what meets the eye. So, to find the “hidden object” I performed a marquee-select, but started right below the large object and then extended beyond the bottom of the Sign Blank. Sure enough, something hidden was obviously selected:

Now I’m always curious about these things, so I tried increasing the size of it, but the program simply wouldn’t allow that. I also tried zooming in… but that didn’t provide anything to see either. But the nice thing is that I was able to simply click on the Delete key and get rid of it.

Then the question becomes… what was this? And what made it happen? Well, when the itty bitty object cannot be resized, then I’m not sure what that object was all about. I don’t think this sort of thing happens with files being created from scratch in KNK/ACS Studio, but I could be wrong. Instead, I think it’s more likely some little quirky thing that showed up when some alternate file format was imported… such as .ai, .eps, .dxf, .wmf, etc. Either way, it really doesn’t matter as long as it can be so easily removed from the file.
But if the itty bitty quirky object can be resized, then you’ll probably be able to see what it is. For example, I’ve had a number of other customers make the mistake of setting the font size too small in the Text Smart Bar:

When this happens and the text is subsequently typed, the user will see something odd on the screen but not realize that it’s simply their typed text at an extremely small size:

Most users will actually think their Text function in the software is “broken” or just suspect that they’ve done something to cause it. That’s why it’s important to take note of the fact that you CAN cause this by setting the text size to 0.01 or some other extremely small size. But in this case, if you go up to the Smart Bar and increase the size of the object, you’ll find your text and then slap your hand on your forehead and say, “Oh duh. Now, I know what I did!”

This same sort of thing can happen when drawing a shape. This happens less frequently, but it’s possible to draw, say, a star, and then as you are clicking away, you actually just barely drag your left mouse button and create a tiny second star:

And if that second tiny star is actually on top of the first star, then with Fill turned on, you’ll never even realize it’s there. Thus, one of the reasons I always suggest to my customers that they turn off the Fill to look at their images before cutting:


Now, another possible situation occurs if you have Fill turned on when you open the file and there are objects that have been colored white, clear, or invisible. You may not be able to see them! But if you check the Job Palette on the right, you will notice that one or more of these “trouble colors” might be present.

Back to the original example, let’s say there is a white object present instead of the itty bitty object. By simply turning off Fill, look what shows up:

Note that you also may NOT see these objects show up if “No Line” is enabled for the Line Style. However, at this point, I’m wandering away from our initial topic and into an entirely different topic about line style. And this post is about itty bitty objects! But, if you have an interest in better understanding this particular topic, then look up “Line Style” in the KNK or ACS User Manuals or check out the downloadable video in my store called: Line Style versus Fill.
by Sandy McCauley | Nov 22, 2009 | Free Videos, Ginsu Knife, Line Style, Thickening Lines, Welding

BeCca contacted me last week with a stick tree that was impossible to cut due to extremely thin branches. So, I used the same process I’ve shown in several of the designing videos on this blog to make the branches thicker. The difference in this particular case was that part of the image needed to remain unchanged.
Ginsu to the rescue! lol I simply cut off the branches, thickened them using the Stroke and Fill tools (combined with the Basic weld), and then reattached the branches to the trunk. The new Thickening Images Video shows the process in detail. Note that I also have videos in my store which cover more details on using the Ginsu Knife and Polyarc Editing.
Finally, after having a partial crash of my site after a Word Press update a week ago, I now have the Store back in business! So, if you have been trying to purchase the new tracing videos without success, they are now available again:
Downloadable Videos
by Sandy McCauley | Nov 19, 2008 | Free Videos, Line Style, Round Corner, Spider Web - Designing a, Welding
The next few posts here will all be updates to previous posts based on receiving new information from different guys reading my blog. Thus, this is called my Thanks, Guys Series.
On October 2, I presented a video on converting a single line stick figure into a cuttable object and on October 14, I presented a video on how to design your own spider web. In both of these videos I used Transform>Round Corner to convert single lines in a drawing to 2D images that can be welded and cut.
A guy at CADLink contacted Chad at Accugraphic to let him know that there was a faster way to achieve the same results I was showing in those two videos. You use the Line Style window to create a Thick Style attribute, apply a Make Path and then a Basic Weld.
Spider Web Part 2
Two things I forgot to include in the video: Go to View and make sure Show Line Style is checked. Now this isn’t critical to the success of the method but without Show Line Style turned on, when you leave the Line Style window, your images will appear as thin lines again and you will think you did something wrong. Of course, it’s kind of fun to actually leave Show Line Style turned off and then go ahead and perform the Make Path and Basic Weld and watch your single line image turn into a thick welded object right before your eyes!
The other thing I forgot to mention in the video is that you have a choice in how your lines appear. There won’t be a big difference in the appearance but definitely try clicking on the End Cap choices and also the Sharp vs Rounded vs Mitered choices to view the effects on your image. The following screen shot shows the location of these settings in the Line Style window:

So, this is definitely an excellent alternative to using Round Corner, especially when you have closed paths in your images. Check in soon for the next post in the “Thanks, Guys! Series. ”


