by Sandy McCauley | Jan 14, 2011 | Designing, Free Videos, Making Path, Outlining Images, Paper Piecing, Welding

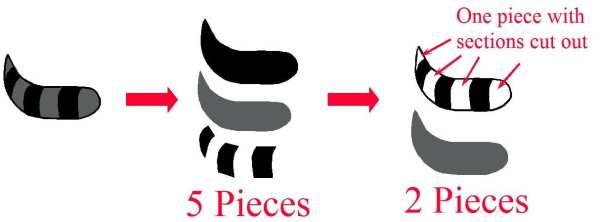
My friend, Susan Mast, sent me an image she was tracing to create the card above. She was stuck on the raccoon’s tail. She had it designed so that there were 5 individual pieces, but what she wanted was just two pieces… a solid gray piece and then a black overlay piece with sections cut out. This makes a lot of sense, especially when designs have many smaller interior paths that would require an insane amount of arranging and gluing.

So, as usual, a picture is worth a thousand words and a video is worth ten thousand! lol So, here’s the video to show you how I took Susan’s tracing of the tail and then turned it into the paper piecing she wanted. Note that this example is a little more complicated than most because we needed to do what I call a die cut weld, in order to get the individual pieces first. Thus, in many situations, you would be starting with just an image with lots of little parts and then creating the cut-out overlay and the slightly shrunken background piece.
Simplifying a Paper Piecing
A big thanks to Susan for allowing me to use her question for today’s post! If you happen to live in Arizona, note that Susan teaches card and mini-album classes at Scrapbooks, Etc in Mesa. Her classes are always so much fun with adorable projects to make! You can also visit her web site and blog to see more of her adorable work.
by Sandy McCauley | Aug 6, 2009 | Breaking Path, Free Videos, Making Path, Welding

An oft-asked question by my customers designing titles goes like this: “I’ve welded some letters together but the middles disappeared! Help!”
Very simple diagnosis and a very simple fix: If you’ve gone to Arrange>Break Path so that you can edit the letters (or any image with interior parts) and you neglect to then do an Arrange>Make Path, then those interior paths will vanish upon welding. So, after editing your letters, just marquis-select each one (making sure you select both the exterior path and the interior path) and then do an Arrange>Make Path. Today’s video shows you exactly how it works.
I fail to mention in the video that this works the same way with just a basic shape. If you have, for example, a flower with a center circle and you have not execute an Arrange<Make Path, then when you weld the flower to any other object, that center circle will disappear. Also, remember that if you ever weld anything and you do not get the results you expected, then always back up a step (Edit>Undo). I’ve also had customers who have performed a Make Path on everything at one time (as I show in the video), then tried to weld and noticed that nothing seemed to happen. Then they begin doing the Break Path and trying to re-Make Path and weld and end up with sort of a mess. So, remember that all-important Edit>Undo as well.
by Sandy McCauley | Dec 8, 2008 | Breaking Path, Free Files, Free Videos, Making Path, Welding

I heard from my VERY first Klic-N-Kut customer yesterday, Kristi H. She posted about needing to modify a very ornate font. So, I had a look at it and decided that this would make a great tutorial in basic welding. I’m not sure I actually fully understand what Kristi needs, but that’s okay. After watching this, I know she’ll let me know if I went down the wrong path. lol In the meantime, this is what I would want to do with these letters to make them more usable for my own cutting.
I have both the video and the letter “H” that I used for the video, in case you want to play with this same font yourself for practice. Note that I kept it rather simple, but you could include a lot more of the flourishes, if you so desire.
Video on Modifying an Ornate Font
File Used in the Video
by Sandy McCauley | May 30, 2008 | Breaking Path, Grouping, Making Path, Ungrouping
As promised, I pondered about real life examples that might help users better understand Grouping versus Making Path. My first thought was Fruit Salad versus a Smoothie… but then I realized that with a Smoothie, you cannot go backwards and extract the individual pieces of fruit back out of it! lol
So, I pondered some more and come up with the following analogy, which I think is pretty cool. 😛
Grouping is like a car pool where you put various people together into a vehicle for the purpose of moving them together from Point A to Point B, BUT those people are still very much individuals from different locations each with their own purpose and priorities. And so, with grouping, the images retain their color and their original format… even raster images remain raster. When grouped you simply can move them as one, rotate, resize etc.
Making Path is more like a sports team where individuals come together, they wear the same uniform (become the same color) and there’s a bigger purpose for them to be together. They perform in unison. Making Path on selected vector images will make them all the same color, convert them all to polyarc or polygon, the nodes for all will show up at once when selected, and if you send then to cut, along with other objects, all of the objects in that “Make Path” group will be cut together before or after other objects.
Does this help?
by Sandy McCauley | May 30, 2008 | Breaking Path, Grouping, Making Path, Raster, Ungrouping, Vector
Thanks to Kathy TwoBears for today’s subject. Great suggestion, Kathy!
In Klic-N-Kut Studio, the difference between Grouping and Making Path can be very fuzzy for most new owners. I even had to get Chad Youngblut at Accugraphic to explain it to me, in detail, early on in my KNK Studio mentoring. Rather than try to explain it in technical terms, he simply provided a few examples to me over the phone and suddenly, the light bulb came on!
Before I begin explaining the differences, remember that a vector image is an image made up of nodes, connected by lines or curves, and these are the required kinds of image for cutting. A raster image is made of thousands or millions of little squares of various colors, like a photograph. A raster image must be traced first, so that there is a vector image to send to the cutter. So now, onto the subject of today’s post…
Applying Layout>Group on two or more objects means:
- KNK Studio still sees them as individual objects, but will have them “linked” together. Thus, when you click on any one image in a group, ALL of the images are selected and you can move them, resize them, rotate them, etc, as one object.
- If the images are different colors, then grouping them WILL retain those assigned colors.
- You can group a raster image with a vector image. This can be very useful with Print and Cut projects where you want to make sure the two images stay perfectly aligned.
- In KNK Studio, you can have layers of grouping. For example, if you have three images: A, B, and C, you can group A and B first. Then group A/B with C. When you then select Layout>Ungroup, the result will be that A and B are still grouped and C is separated. You need to then go to Layout>Ungroup again to separate A from B. This is a VERY useful feature in the software!
Applying Arrange>Make Path on two or more objects means:
- KNK Studio sees them as ONE object. Double clicking on the image will bring up the nodes for ALL of the paths for the images, even though they are made up of separately closed paths on their own. A great example is to type a letter “B”, go to Arrange>Text to Graphics, and then double click. You’ll see the nodes for the exterior path of the “B”, as well as the two interior paths. However, if you double click on grouped objects, this causes the Group Viewer window to open, rather than seeing the nodes. This tells you immediately that if you wish to view the nodes, then you must ungroup those objects and then double click on just one of the objects.
- If the images are different colors, then Arrange>Make Path will cause all images to become the same color…. which color will be selected, amongst the choices from each object, is yet for me to determine! I think it’s whichever color is assigned to the earliest object created amongst the ones selected… but does it really matter? If you don’t like it, change it! lol
- You cannot do an Arrange>Make Path with a raster image included in the selection of images. This option will be grayed out if you try to include the raster image.
- There are no “layers” of making path. Again, let’s go back to images A, B, and C. If you do an Arrange>Make Path on A and B and then do the same on A/B and C. Then when you do Arrange>Break Path, all of the paths immediately become individual paths.
Now, perhaps I’ve just made this MORE confusing rather than LESS? If so, don’t fret, I will address this again after I have a chance to sleep on it and maybe think of some great analogy outside KNK Studio. 🙂


