by Sandy McCauley | Jan 14, 2011 | Designing, Free Videos, Making Path, Outlining Images, Paper Piecing, Welding

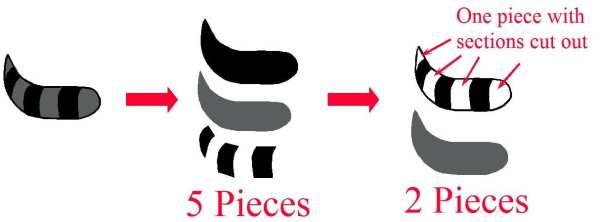
My friend, Susan Mast, sent me an image she was tracing to create the card above. She was stuck on the raccoon’s tail. She had it designed so that there were 5 individual pieces, but what she wanted was just two pieces… a solid gray piece and then a black overlay piece with sections cut out. This makes a lot of sense, especially when designs have many smaller interior paths that would require an insane amount of arranging and gluing.

So, as usual, a picture is worth a thousand words and a video is worth ten thousand! lol So, here’s the video to show you how I took Susan’s tracing of the tail and then turned it into the paper piecing she wanted. Note that this example is a little more complicated than most because we needed to do what I call a die cut weld, in order to get the individual pieces first. Thus, in many situations, you would be starting with just an image with lots of little parts and then creating the cut-out overlay and the slightly shrunken background piece.
Simplifying a Paper Piecing
A big thanks to Susan for allowing me to use her question for today’s post! If you happen to live in Arizona, note that Susan teaches card and mini-album classes at Scrapbooks, Etc in Mesa. Her classes are always so much fun with adorable projects to make! You can also visit her web site and blog to see more of her adorable work.
by Sandy McCauley | Sep 15, 2010 | Outlining Images, Rhinestones
I have the rhinestone calculators on-line now! So, for those of you needing this capability, but you do not own Excel, here’s a link to them (or you can find them under the Support tab and then under Special Rhinestone Support Section):
Rhinestone Calculators
Also, if you need the actual formulas because you want to program them into your calculator or whatever, then here is the full documentation on the formulas, including how I developed them:
Rhinestone Respacing Documentation
by Sandy McCauley | Sep 3, 2010 | ACS, Free Videos, KNK, Outlining Images, Rhinestones, Videos

Rhinestone pattern resizing is a relatively easy process and most everyone already doing rhinestone designing probably has their own method, depending on which software they use. My new customers often contact me for guidance so I decided to make a video for them, as well as create a simple Excel calculator to make the process simpler.
But re-spacing the circles in a pattern is a different matter. This has come up dozens of times and, until a few weeks ago, I typically said that you are stuck with what you get in the original design. However, that’s not true. I pondered it for a while and then spent an entire weekend “doing the math” and came up with a method whereby an existing pattern can have the circles moved closer together or farther apart, while maintaining the exact same pattern design and circle size. The most obvious application for this would be when a pattern is resized for a different size stone and the spacing between the circles subsequently becomes too large or too small. But it can also be used when designing with rhinestone fonts in which the spacing is already determined based on the font design. If you do not like the spacing, then CHANGE IT using my method and the rhinestone spacing calculator (anther Excel spreadsheet I’ve created).
So, the links to the tutorial videos are below. If you cannot open an Excel 2007 spreadsheet, no problem. Accugraphic is working on making these two calculators available on the Internet. Or you can download the free OpenOffice program and use that. Note that while the videos were made using functions in ACS and KNK Studio, I’m fairly certain these same functions I’m using can be found in the other major designing programs, such as Corel Draw, Funtime, and WinPC Sign.
Resizing Rhinestone Designs Video
Re-spacing Rhinestone Designs Video
by Sandy McCauley | Oct 1, 2009 | Free Videos, Inkscape, Outlining Images

Lisa B posted to the I Love KNK group asking if there is an easy way to fit your text into another shape… such as I show in the above screen shot. The answer is, “Yes, but you need to use Inkscape.” The process isn’t difficult, but it does require a number of steps as shown in today’s video:
Fitting Text to a Shape
If you do not already have Inkscape, then it’s a free download from Inkscape.org and I believe this will work the same in either the 0.46 version or any of the beta 0.47 versions. The only tricky part I’ve run into is getting the text set to the font I want to use. Inkscape has always had a few quirks with their text function. But you should be able to do what I show in the video and then type what you need for your shape.
Also remember to verify that your original shape from KNK Studio matches the shape in Inkscape. It will also flip vertically during the conversion, so check that. Otherwise, have fun with it and maybe, someday, we’ll be able to do this in KNK Studio automatically!
by Sandy McCauley | Jul 14, 2009 | Fit Object to Path, Free Videos, Outlining Images, Rhinestones

There are several ways to fill a rhinestone pattern using KNK Studio. The video I have for you today shows how to use Transform>Inline to create a series of progressively smaller inlines to then use in aligning circles along a path. Then we use the same Transform>Fit Object to Path to get the circles aligned along the circles. You will need to tweak the locations of the circles to get the perfectly look, but again it’s just a case of shift them around with your mouse and adding/deleting as necessary. : )
by Sandy McCauley | Apr 15, 2009 | Array, Designing, File Extensions, File Import, Flourishes - Designing, Free Videos, GSD Files, GST Files, KNK, MAXX, Outlining Images, Print and Cut, Reducing Nodes, Round Corner, Sign Blank, Toolbars, Welding
Today I’m covering TWO topics that have been brought up by customers. The first is importing the GST template files that come with Craft Robo’s RoboMaster, Silhouette RoboMaster, and Wishblade Advance 3.0. The other is importing GSD files into KNK Studio.
With the GST files, we’ve had great success with the imports. I’m sure it has to do with how they are originally created but they all seem to work. Even the GST files purchased from Quickutz through their Silhouette software will import readily once the file extension is changed to a GSD. Here’s the video showing you how to do this:
Importing GST Files into KNK Studio
However, the GSD’s that are created from the umpteen different ways possible: manually drawn in various versions of RoboMaster, auto-traced in various versions of RoboMaster, imported from Inkscape, imported from Adobe Illustrator, imported from Win PC Sign, etc, all yield variations and only some will successfully import. However, it’s always worth trying the import before using one of the several conversion methods. But you have to watch out… sometimes it will import and not seem to be there or will only partially import, or will import with gaps in the vector paths.
So the following video shows you 6 different circumstances you might encounter when importing GSD’s. If you find something else quirky happening, be sure to send me the file. I’m happy to have a look and maybe I’ll learn something else to share here.
Importing GSD Files into KNK Studio


