by Sandy McCauley | Jan 14, 2011 | Designing, Free Videos, Making Path, Outlining Images, Paper Piecing, Welding

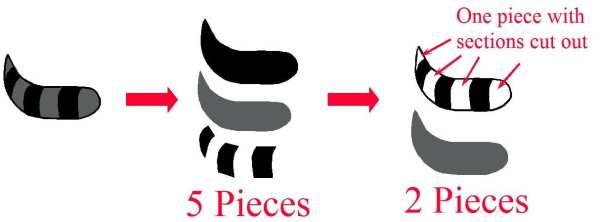
My friend, Susan Mast, sent me an image she was tracing to create the card above. She was stuck on the raccoon’s tail. She had it designed so that there were 5 individual pieces, but what she wanted was just two pieces… a solid gray piece and then a black overlay piece with sections cut out. This makes a lot of sense, especially when designs have many smaller interior paths that would require an insane amount of arranging and gluing.

So, as usual, a picture is worth a thousand words and a video is worth ten thousand! lol So, here’s the video to show you how I took Susan’s tracing of the tail and then turned it into the paper piecing she wanted. Note that this example is a little more complicated than most because we needed to do what I call a die cut weld, in order to get the individual pieces first. Thus, in many situations, you would be starting with just an image with lots of little parts and then creating the cut-out overlay and the slightly shrunken background piece.
Simplifying a Paper Piecing
A big thanks to Susan for allowing me to use her question for today’s post! If you happen to live in Arizona, note that Susan teaches card and mini-album classes at Scrapbooks, Etc in Mesa. Her classes are always so much fun with adorable projects to make! You can also visit her web site and blog to see more of her adorable work.
by Sandy McCauley | May 17, 2010 | Editing, Fold-Up Projects, Free Videos, Ginsu Knife, Welding

Thank you to Heather L for today’s subject. Heather sent a fold-up gable box pattern that was sized to ~ 10 x 6.5. She wanted to make it as large as possible for a 12 x 12 sheet of cardstock. Now the issue with resizing fold-up patterns is that you have to keep the overall width and height proportional or your pattern will not necessarily still fold up correctly. This was precisely the situation with Heather’s box. After stretching the image to fit a large square shape, the side flaps were too large to fold inwards to form the box.
Not to worry! This is a perfect application for the Ginsu Knife tool. Once I stretched the image, I cut off the two flaps and resized their width to match base of the box. Then I welded them back into place. The key was to just know which dimensions needed to still match so that the box pattern would work. The only thing is that you may need to do a test cut after stretching any given fold-up pattern to see for yourself which parts still work and which parts will need adjusting. If you have a pattern yourself that you cannot figure out, then please send it to me! This is a terrific new subject to explore.
Here’s the video to watch: Heather’s Gable Box Resizing
by Sandy McCauley | May 12, 2010 | Flip, Free Videos, Welding

Thanks to Margaret for today’s idea. She posted to the Klic-N-Kut Yahoo group with a welding issue. She wanted to weld a partial outline of flowers to a flower pot for the purpose of creating a shaped greeting card. The problem is that you cannot weld unclosed objects. In Margaret’s project, by turning on Fill, you can see that the top part is not closed and bottom part is closed:

In general, when you need to do a basic weld on two objects and either or both are not closed, it’s easy to get them closed. If the path you need to close is continuous, then just select the image and go to Arrange>Close Graphics. Or, if the path is not continuous, then you can try Arrange>Connect Path and enter a fairly large value (try 1) and all gaps will close… hopefully… although, you may find that the wrong ends get joined together diagonally across your image!
In today’s video,
Flower Pot Design
I show another way to connect the two ends of a gap. Just select the end nodes and use the middle top icon to connect the ends with a straight line. Then you can proceed with the rest of the weld.
For those interested in designing shaped greeting cards, watch the entire video to see how easy it is to use the Flip and Weld technique to create perfect symmetry and even a dashed fold line, if desired.
by Sandy McCauley | Apr 23, 2010 | Coloring Book, Free Videos, Line Style, Welding

Thanks to Sharon M for today’s topic about converting a paper piecing project into a coloring book image. It’s very simple to do and it only took a few steps to show the basic procedure:
Creating a Coloring Book Image
However, there were a few things that were a little different about Sharon’s project so it provided an opportunity to cover a few more features in the software, specifically how to weld some of the individual pieces before using the Thick Line Attribute. And also how to die cut one image from another. Both of these have been covered in previous posts, however this project gave new applications.
As usual, as I’m typing this now, I realize that I forgot one of the important tips when recording today’s video. UGH!!! When you have completed your coloring book image, you may wish to save it as a PDF file OR even convert it to a JPG or BMP. For PDF, just go to File>Publish to PDF. Remember to uncheck the box which forbids printing:

Whether or not you choose to forbid editing is entirely up to you. : ) You will need to select a password if you do choose that option.
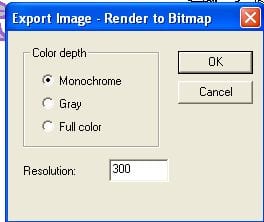
If you wish to export as a JPG or BMP, select the image first, then go to File>Export image and you can select Monochrome since it will be a black and white image. Normally, 300 is the standard resolution used in digital images, so I would recommend leaving that at 300.

Of course, if you are doing this with a colored image, then leave the Full Color option checked.
The last step will be to name your exported image, select a location on your computer to save it, and then you have your choice of five raster formats: .bmp, jpg, .pcx, .png, or.tif.
So, have fun converting images to coloring book pages for the children in your life! Or even for YOU! Happy Coloring! 🙂
by Sandy McCauley | Apr 20, 2010 | Free Videos, Rhinestones, Welding

Need a quick balanced rhinestone fill option? Check out the newest method I found for filling images in KNK Studio with circles. It involves using the Array function to create a pattern of horizontal lines through your image:

Move the image to the top of the lines. Select both the image and the line array and apply the AND Weld function:

Then another Make Path is applied, a circle added and the usual Transform>Fit Object to Path, results in the pink pattern shown at the top right of this post.
Other options are available. For example, I could have angled the lines or even made them vertical versus horizontal:

And this would have resulted in a different overall look as shown in the image in the middle. At this point, I could even borrow one part from image and combined it with another part from the other image, producing the fill pattern shown at the far right. As always… many options!

As usual, I have a video for those who want detail! Enjoy! Note that this method also works well filling letters.
Filling Rhinestone Patterns Using the AND Weld
by Sandy McCauley | Mar 5, 2010 | Bite Mark - Designing, Editing, Free Videos, Welding

Carol B contacted me late yesterday asking how she could create a bite mark in a cookie or an apple. Now the basic way would be to use the Ginsu knife tool and just hold down the left mouse button and draw the bite mark through the image and separate:

The problem is that I’m a lousy artist, thus my bite just doesn’t “work for me!” lol
So, I remembered the apple file that comes with KNK Studio and figured that it would be a good starting point because it has a bite taken from it. So, have a look at this video and you’ll see how I transferred that exact same bite to a circle to create the cookie:
Bite Mark Video
Thanks, Carol, for yet another great video idea!


