by Sandy McCauley | Apr 15, 2009 | Array, Designing, File Extensions, File Import, Flourishes - Designing, Free Videos, GSD Files, GST Files, KNK, MAXX, Outlining Images, Print and Cut, Reducing Nodes, Round Corner, Sign Blank, Toolbars, Welding
Today I’m covering TWO topics that have been brought up by customers. The first is importing the GST template files that come with Craft Robo’s RoboMaster, Silhouette RoboMaster, and Wishblade Advance 3.0. The other is importing GSD files into KNK Studio.
With the GST files, we’ve had great success with the imports. I’m sure it has to do with how they are originally created but they all seem to work. Even the GST files purchased from Quickutz through their Silhouette software will import readily once the file extension is changed to a GSD. Here’s the video showing you how to do this:
Importing GST Files into KNK Studio
However, the GSD’s that are created from the umpteen different ways possible: manually drawn in various versions of RoboMaster, auto-traced in various versions of RoboMaster, imported from Inkscape, imported from Adobe Illustrator, imported from Win PC Sign, etc, all yield variations and only some will successfully import. However, it’s always worth trying the import before using one of the several conversion methods. But you have to watch out… sometimes it will import and not seem to be there or will only partially import, or will import with gaps in the vector paths.
So the following video shows you 6 different circumstances you might encounter when importing GSD’s. If you find something else quirky happening, be sure to send me the file. I’m happy to have a look and maybe I’ll learn something else to share here.
Importing GSD Files into KNK Studio
by Sandy McCauley | Apr 4, 2009 | Free Videos, KNK Samples, Outlining Images, Welding

In early March, I taped five segments for a PBS show called Creative Living with Sheryl Borden. The episodes with these segments will air on ~140 stations next fall however we had permission to put the segments on You Tube now. The first segment was over 10 minutes and, thus, needed to be broken into two videos for You Tube.
KNK for Scrapbookers and Card Makers Part 1
KNK for Scrapbookers and Card Makers Part 2
Below are close-up photos of some of the samples I presented during this first segment. Note that you can click on the images to get larger views!
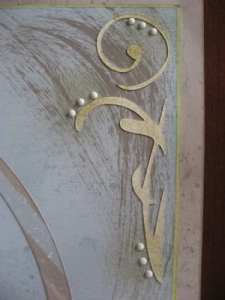
The following beautiful layouts were designed by Susan Mast who owns Master Scrapbook Designs. Susan has been using Klic-N-Kuts in her business for just over two years:

I loved Susan’s use of the tiny brads to enhance both the flourish and the words she cut on her Klic-N-Kut:


Check out the incredible number of layered flowers used on this next layout:


Because we hear from so many scrapbookers interested in using overlays in their scrapbooking, I provided Susan with an overlay file from Diana’s Designs. Susan used this file to create a layout of her brother on vacation in Jamaica:


Susan teaches mini-album classes at Scrapbooks, Etc in Mesa Arizona. Here is one of my favorites which shows her fabulous use of small embellishments designed and cut on the Klic-N-Kut. In the taped segment, I show one of Susan’s “blank” copies. The one below is the actual mini-album I created when I took her class.


This is the other mini-album shown in the segment. I had Susan email me a few photos of her finished copy:


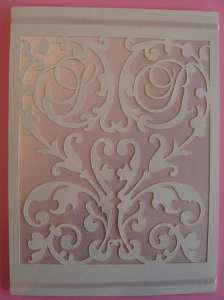
The following two cards were designed and cut by Chris Giannoulas who owns a Klic-N-Kut Maxx and has started a card business in southern California. She creates these intricate designs and then cuts them from fairly stiff, high quality cardstock. They’re just beautiful to hold and view in person.


These two insects were auto-traced from a Close to My Heart stamp set and the tracings expanded using the Outline function in KNK Studio. Next the insects were cut from white cardstock and then stamped with the actual stamps. I have a previous blog post which covers the details: Creating Cutting Files from Your Favorite Stamps

In this card, I used a dingbat font to type out the flower. Then I simply welded that flower to the inside of a rounded rectangle. This literally took a minute or less to design.

Now for some recipe layouts! In this layout, I stenciled the letters so that the interior parts woud stay connected to the outside:


My friend, Brenda Schonig, created this adorable layout. I love the die cut of the monkey.


This comical banana is one of the 4000 .knk files which comes with the purchase of a Klic-N-Kut. I also wanted to show how I had welded the letters in “Flaming” to a rectangle so that I could keep the letters separated for better readability but at the same time, have everything cut as one piece for easier gluing onto the layout:


This is a close-up photo of a print and cut done on the KNK Maxx. The laser light makes the print and cut process relatively fast and definitely very accurate:

Finally, here is the example cut in the show. Note the really cool 3 dimensional look from using the Shadow function in KNK Studio:

As the other segments are uploaded to You Tube, I will be posting the links and more photos here. If you have any questions about the Klic-N-Kut or any of the projects, please feel free to email me at smccauley45@cox.net. I sell Klic-N-Kuts on commission with the makers: Accugraphic, Sales. Their web site is: Scrapbook Die Cutter. Note that I provide extra support and videos to my own customers, so please contact me if you are interested in purchasing a Klic-N-Kut.
by Sandy McCauley | Mar 31, 2009 | Easter Eggs - Designing, Hot Keys, Polyarc, Shortcuts, Transformation, Welding

The main purpose of this video is not so much about the Easter egg, but rather to illustrate a great assortment of tools and hot keys available in KNK Studio… functions you will be able to use elsewhere in your design work with this wonderful software. Some of these have been covered in other videos and the usage of them in this video will be a reminder. But there are also a couple of new things I show.
While watching the video, take note of the following functions:
Tranformations: used to distort images -I use it to convert an oval to an egg shape. As a reminder when using the functions in this window, you get different results if you also hold the Ctrl key versus the Shift key versus no key. Try it out!
In Polygon editing mode, select any two nodes and then press “I” on the keyboard to insert nodes
Similarly, in Polyarc editing mode, there is a Divide icon in the Smart Bar which allows you to insert a specific number of nodes along the path between any two existing nodes.
Use the Stroke and Fill tools to thicken any open path and then use the Basic Weld tool to convert to a closed path.
Select an image and place the cursor over the center. Hold down both Alt and Ctrl keys on your keyboard and drag the center. A copy of the image will be created and you can only drag the image horizontally or vertically to keep it aligned with the original.
When Object A is on top of and extends beyond Object B, use the AND Weld tool to trim the excess from Object A to fit Object B.
When moving an object on the screen, hold down the Shift key while using the arrow keys on the keyboard and the object will move much faster than if you only use the arrow keys alone.
If you have ANY questions about the use of these functions, be sure to post. And here’s the link to the Easter Egg Video!
by Sandy McCauley | Dec 15, 2008 | Cupcake Wrapper, Designing, Welding
I was contacted by a bakery owner in Florida interested in a Klic-N-Kut if she could design and cut her own cupcake wrappers. She sent me to a web site selling some very elaborate designs and I instantly became obsessed with creating a basic file that could then be modified to fit any celebration or any holiday. Once we had a basic scan of a pattern, it was easy to recreate the shape and then simply create words and images to weld to the top, such as this simple Happy Birthday prototype I created:

Then I decided to try a few Christmas designs and they were fun to make as well. Obviously, the possiblities are limitless! Note that you don’t bake the cupcakes with these cutouts… they are meant to be applied after the cupcake is complete with icing and decorations… simply wrap around a cupcake, fold up a tab, insert tab into a cut slit, and reopen the tab.
Here are two links to help you in your own designing. And I promise to not to tell anyone if you prefer to buy the cupcakes from your local grocery store and just cut out your own wrappers to make them look like YOUR OWN CREATIONS! 😛
Link to free zip with KNK files for simple Happy Birthday, Noel, and Basic Pattern for Cupcake Wrapper
*** New *** Cupcake Wrapper Templates for Designing in KNK, MTC, SVG, EPS, PDF, and Studio formats
(Big thanks to Judy Keating for sharing her designs and to Gayle Galura-Scott for converting to .Studio for the Silhouette owners!)
Link to web site selling cupcake wrappers – get some GREAT ideas here!
by Sandy McCauley | Dec 8, 2008 | Breaking Path, Free Files, Free Videos, Making Path, Welding

I heard from my VERY first Klic-N-Kut customer yesterday, Kristi H. She posted about needing to modify a very ornate font. So, I had a look at it and decided that this would make a great tutorial in basic welding. I’m not sure I actually fully understand what Kristi needs, but that’s okay. After watching this, I know she’ll let me know if I went down the wrong path. lol In the meantime, this is what I would want to do with these letters to make them more usable for my own cutting.
I have both the video and the letter “H” that I used for the video, in case you want to play with this same font yourself for practice. Note that I kept it rather simple, but you could include a lot more of the flourishes, if you so desire.
Video on Modifying an Ornate Font
File Used in the Video
by Sandy McCauley | Nov 19, 2008 | Free Videos, Line Style, Round Corner, Spider Web - Designing a, Welding
The next few posts here will all be updates to previous posts based on receiving new information from different guys reading my blog. Thus, this is called my Thanks, Guys Series.
On October 2, I presented a video on converting a single line stick figure into a cuttable object and on October 14, I presented a video on how to design your own spider web. In both of these videos I used Transform>Round Corner to convert single lines in a drawing to 2D images that can be welded and cut.
A guy at CADLink contacted Chad at Accugraphic to let him know that there was a faster way to achieve the same results I was showing in those two videos. You use the Line Style window to create a Thick Style attribute, apply a Make Path and then a Basic Weld.
Spider Web Part 2
Two things I forgot to include in the video: Go to View and make sure Show Line Style is checked. Now this isn’t critical to the success of the method but without Show Line Style turned on, when you leave the Line Style window, your images will appear as thin lines again and you will think you did something wrong. Of course, it’s kind of fun to actually leave Show Line Style turned off and then go ahead and perform the Make Path and Basic Weld and watch your single line image turn into a thick welded object right before your eyes!
The other thing I forgot to mention in the video is that you have a choice in how your lines appear. There won’t be a big difference in the appearance but definitely try clicking on the End Cap choices and also the Sharp vs Rounded vs Mitered choices to view the effects on your image. The following screen shot shows the location of these settings in the Line Style window:

So, this is definitely an excellent alternative to using Round Corner, especially when you have closed paths in your images. Check in soon for the next post in the “Thanks, Guys! Series. ”


