Page 230 - Klic-N-Kut User Manual
P. 230
The layers to be drawn (glasses, inner circle, and outer rectangle) are showing on the Layers Bar and the
layer with the cut line is turned off:
Hide the layer to be cut
Set the origin using the laser and select WYSIWYG for the Cut Type. Turn off Blade Offset and then set
the appropriate Force and Speed. Draw the shapes with the pen.
Turn off the layer with the glasses and the circle, but leave the outer rectangle layer turned on. Also, now
show the layer with the circle to be cut:
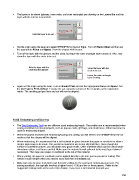
Hide the layer with the Show the layer with the
circle and the glasses circle to be cut.
Leave the outer rectangle
layer showing.
Again set the origin using the laser. Turn on Blade Offset and set the appropriate Force and Speed. Set
the Cut Type to Print and Cut. Execute the cut, using the corners of the rectangle as the registration
marks. The resulting gel pen lines and cut will now be aligned:
10.08 Embossing and Scoring
The Zing Embossing Tool has two different sized embossing heads. The smaller one is recommended when
scoring cardstock for fold-up projects, such as pop-up cards, gift bags, and small boxes. Either head can be
used for embossing shapes.
When the project involves both embossing/scoring and cutting, you will need to use WYSIWYG for the cut
mode so that the shapes will be aligned.
When embossing, it is recommend that a soft material be place beneath the paper or cardstock to allow a
deeper impression to be made. One excellent material to use is non-slip shelf liner. Even though the
surface is somewhat uneven, you will obtain very good results. Other materials which can be used include
rhinestone rubber, craft foam, and felt. Make sure the material is well adhered to the mat (tape it down, if
necessary). Then tape your paper or cardstock to the top of this material.
When scoring, the paper or cardstock can be applied directly to the mat, just as you do for cutting. This
makes it much simpler when you need to score and then immediately cut.
Make sure you do some tests first to get the best settings for the scoring or embossing you need. For
scoring cardstock, this typically involves a higher force (~150) and two or three passes. Refer to the
Suggested Settings table at the end of this chapter. If you have a soft material beneath your
230