Page 55 - KNK Groove with MTC User Manual
P. 55
To merge two layers, right click on the thumbnail for one of the layers and select Cut Layer. Then right click
on the thumbnail for the other layer and select Paste Layer. Then immediately click on the Selection to
New Layer icon. This will create a new layer containing all of the shapes from those two layers.
3.13 Resizing, Rotating, Slanting, and Warping
The Resizing, Rotating, Slanting and Warping functions are presented together because all four can be
readily applied to any selected shape.
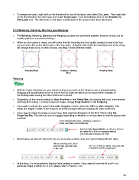
When you first select a shape, you will notice that the bounding box has double headed arrows at the four
corners and in the center along each of the four sides. A double click inside the bounding area of the shape
will change those icons to other choices, resulting in three different modes:
Resizing Mode Rotating / Slanting Warping Mode
Mode
Resizing
With the shape selected, use your mouse to drag any corner of the shape to resize proportionately.
Dragging the double-sided arrow on one of the four sides will allow you to resize either vertically or
horizontally while leaving the other dimension constant.
Depending on the current setting for Snap Position on the Virtual Mat, the resizing will occur in increments
matching that setting. To freely resize the shape, change Snap Position to No Snapping.
If you wish to release the aspect ratio while dragging a corner, press the Ctrl key while dragging. This
allows the height or width of the shape to be freely changed without changing the other dimension.
If you need to make the shape an exact size, then enter the dimension in the W or H box in the Sel.
Properties Bar. The lock icon can be toggled depending on whether or not you want to hold the aspect ratio
constant:
Enter desired dimension, including a decimal
point, and then press Enter key.
Indent to hold Aspect Ratio; out-dent to release
and allow W or H to be changed without
automatically changing the other.
Dimensions can also be entered in mm or cm as long as those units are entered along with the value:
When entering units, other
than inches, add the units The size in inches will be automatically
to the end. calculated and then displayed.
At this time, it is not possible to display these settings in metric. If you need to know the W and H of a
particular shape in either cm or mm, please refer to Section 7.08.
55