Page 131 - Klic-N-Kut User Manual
P. 131
Using the Draw Freehand Lines tool (Pencil Tool) (refer to Section 7.10): If you own a graphics tablet
and enjoy freehand drawing, you may find this method workable for manual tracing. It’s not covered in
this tutorial because it’s fairly simple to freehand draw lines and curves as presented in Section 7.10.
But unless you have a very steady hand, your tracing will probably require considerable node editing if
you want smooth curves in the final design.
Using the Draw Bézier Curves and Straight Lines tool (Bézier or Pen Tool) (refer to Section 7.12):
Review this section and practice using the tool to draw both straight lines and curves before attempting
to repeat the steps shown in the following tutorial.
Importing an Image for Manual Tracing
Raster images can be imported using either Pixel Trace (refer to Section 6.03) or as Texture filling a shape
(refer to Section 3.14). The former method will be presented here.
Click on the Pixel Trace icon and browse to locate the image you want to trace. You can also scan in an
image or paste an image that has been copied to the Windows Clipboard. In this tutorial, the dress image
from this web site will be used:
http://houseofstirfry.com/chia/templates/dress01.html
Note that this dress could easily be pixel traced but because it provides a great example of how the Bezier
curves can be drawn to fit a shape such as this, it will be used for the manual tracing example!
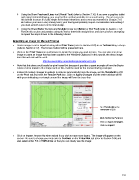
Instead of making changes to settings in order to automatically trace the image, set the Threshold to 255
on the Pixel tab and mark the Texture Path box. Click on Apply Changes and the entire window will fill
with green indicating a rectangle around the image will form the trace line:
Set Threshold to the
maximum of 255.
Mark Texturize Path box
Click on Apply Changes.
Click on Import
Click on Import. Answer No when asked if you wish to trace more layers. The image will appear on the
screen. Be sure to change your mat color to Contrast on the Virtual Mat tab (refer to Section 3.04) and
also select either Fill or Fill/Outline so that you can clearly see the image:
131