Page 218 - Klic-N-Kut User Manual
P. 218
A pixel trace can often have areas where the trace line (cut line) will be outside of the original image. This is
especially true of tight interior corners or sharp turns on the image. This results in white areas appearing
around the print and cut:
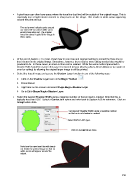
The red arrows indicate spots around
our cow’s left ear where white areas
would show when cut. The original
trace line doesn’t quite fit the image in
those spots.
At the end of Section 7.13, it was shown how to use node and segment editing to correct the trace line so
that it better fits the original image. Sometimes, however, there may be more editing needed than would be
practical to do. In these cases, an inset cut line can be created. While the same method presented in
Section 9.06.3 could be used, in this case it is desired to have what is called a bleed allowance (a margin of
error for cutting) by allowing the original larger image to still be printed.
Select the traced image and access the Shadow Layer function in any of the following ways:
Click on the Shadow Layer icon on the Magic Toolbar
Press Ctrl+H
Right click on the screen and select Shape Magic>Shadow Layer
Go to Edit>Shape Magic>Shadow Layer.
Select the desired Shadow Width using a negative number so that an inset is created. Note that this is
typically less than 0.03”. Select a Corner Join option and refer back to Section 8.05 for reference. Click on
Accept when done.
Set desired Shadow Width using a negative number
so that an inset shadow is created.
Select Corner Join type.
Click on Accept when done.
Note how the new inset line will clearly
cut inside the printed image so that no
white areas will appear around the
cutout.
218