Page 213 - Klic-N-Kut User Manual
P. 213
If a PNC is not precise and the cause is not the alignment of the trace lines, then try slowing down the
speed even more. If the mat is moving numerous times, in and out of the cutter, a slight shifting can occur,
especially at higher speeds. Try reducing the Cut and Up Speeds.
Remember that the calibration of the Laser Offset is specific to the blade holder type being used. Thus, if
you change brands, the laser calibration will need to be modified.
If your test arrow is cutting perfect, thus indicating you have the correct calibration, but your next print and
cut is way off, then perhaps your situation is something outside of the ordinary. Please review the following
section which covers different scenarios in which a few extra steps will be required when setting up the
layers for your print and cut.
It is not necessary to set the origin or even put the printout on the mat in advance of starting the PNC
procedure. Watch this video for a way to make the process a little quicker!
9.06 Print and Cut Scenarios
9.06.1 Cutting Multiple PNC Images on the Same Page
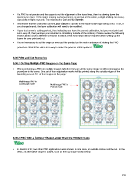
When performing a PNC on multiple images (whether they are all the same image or different images), the
procedure is the same. One set of four registration marks will be printed along the outside edges of the
bounding area of ALL of the images on the page:
Multi-image PNC in
Landscape mode Multi-image PNC in
Portrait mode
9.06.2 PNC With a Contour Shape Larger Than the Printed Image
In Section 9.01, two other PNC applications were shown. In one case, an outside contour will be cut. In the
other, an alternative shape is added, such as the tag shape shown below.
213