Page 211 - Klic-N-Kut User Manual
P. 211
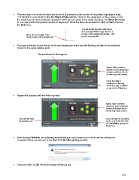
The next step is to move the laser dot so that it is precisely at the corner of the printed registration mark.
This window is very similar to the Set Blade Origin window. Click on the arrow keys on the screen or use
the arrow keys on your keyboard. Important: once you are close to the mark, decrease the Move By setting
to 4 so that you’ll have precise control on alignment. Once the laser dot is dead-on, click on Next or press
the Enter key.
You will notice that the intensity of
the laser light will change when it is
Move the laser light to the on top of the printed black lines. This
dead center of the printed dot. can be very useful!
The laser will move to the vicinity of the next registration mark and the flashing red light in the software
moves to the same relative point:
This dot will now be flashing red
Again, click on these
arrows or your keyboard
arrows until laser dot is
on the reg mark corner.
Once the light is
centered on the reg
mark dot, click on Next
or press the Enter key.
Repeat the process with the final reg mark:
Again, click on these
arrows or your keyboard
arrows until laser dot is
on the reg mark corner.
This dot will now Once the light is centered
be flashing red on the reg mark dot, click
on Finished or press the
Enter key.
After clicking Finished, the following window will open and remind you to wait until the cutting has
completed before going back to the Cut with Klic-N-Kut Zing window:
Once you click on OK, the arrow shape will be cut out.
211