Page 191 - KNK Groove with MTC User Manual
P. 191
Check these three options
Check this option if you want
an outline only of the arrow Set to 0 as this does not
printed (to save on ink!) apply to KNK cutters.
Option to change color of the image outline
Click on OK when done
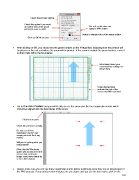
After clicking on OK, you should see the green borders on the Virtual Mat, indicating how the printout will
be placed on the mat and where the arrow will be printed. If the arrow is outside the green borders, move it
so that it falls within the boundaries:
Information about your
current printer settings are
shown here.
Green dashed lines
indicate the part of the
screen that will be printed.
Go to File>Print Preview and you will be able to see the arrow plus the four registration marks which
should be aligned with the boundaries of the arrow:
Click here to print.
Check this preview carefully.
Do you see all four
registration marks? (red
arrows point out the 4 reg
marks)
Will you be getting what you
need printed?
(Note that the Wireframe
option was turned off for this
screen shot so that the
image could more clearly be
seen in this tutorial).
Always make sure you can see those registration marks before continuing since they are an integral part of
the PNC process. If your print preview matches the one above and you see the four marks, click on the
191