Page 196 - KNK Groove with MTC User Manual
P. 196
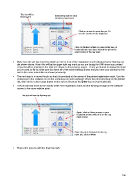
This dot will be
flashing red Select step size for each
arrow key movement
Click on arrows to move the pin. Or
use the arrows on the keyboard.
Click on Center button (or press Enter key on
keyboard) after you have moved the pin to the
exact corner of the reg mark
Make sure the pin has moved to within an inch or less of the registration mark indicated by the flashing red
dot shown above. Note: this will be the upper right reg mark as you are facing the KNK since your printed
arrow should be pointing to the right (as shown on the previous page). If not, you’ll want to review the steps
you’ve used so far to make sure you have all of the same settings shown and you have your printout on the
mat in the same orientation as shown previously.
The next step is to move the pin so that it is precisely at the corner of the printed registration mark. Use the
arrow keys in the software or use the arrow keys on your keyboard. When the pin is precisely on the printed
dot, click on the center target button on the screen (or press the Enter key on your keyboard).
The pin will now move to the vicinity of the next registration mark and the flashing red light in the software
moves to the same relative point:
This dot will now be flashing red
Again, click on these arrows or your
keyboard arrows until pin is on the reg
mark corner.
Once the pin is centered on the reg
mark dot, click on Next.
Repeat the process with the final reg mark:
196