Page 219 - KNK Groove with MTC User Manual
P. 219
Because this shape will be cut from another material to use in the alignment process, the shape is
resized to be a tiny bit larger. For a circle, you can simply resize it in the Sel Properties Bar. If the
shape is something non-symmetrical, then use the Shadow Function with a Shadow Width of about
0.04”.
Next the desired lettering and/or shapes are added. In this case, the dog’s name and a phone number
with “Please Call” are chosen. Because there is also a hole near the top of this dog tag, a ¼” high
square is added just to show the top limit of where the lettering could be located. This is deleted as soon
as the lettering is added and positioned:
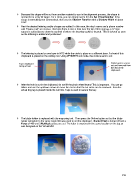
The lettering is placed on one layer in MTC while the circle is place on a different layer. A sheet of thin
chipboard is placed on the cutting mat. Using WYSIWYG cut mode, the circle is sent to cut:
Tape chipboard Circle layer is sent to
to top of mat cut and removed from
the rest of the
chipboard.
After the hole is cut in the chipboard, do not lift the pinch wheel levers! This is important. You can go
offline and use the up/down arrows to move the mat so that the cut circle can be removed. Then the
actual dog tag is placed inside the cut hole. Tape is used to secure the tag:
The blade holder is replaced with the engraving tool. Then press the Online button so that the blade
holder will return to the same origin that was used to cut the chipboard. Blade Offset is turned off and a
Force of 400 and 3 Multicut passes are set. The letter is engraved in the same location on the tag as
was designed on the Virtual Mat:
219