Page 211 - KNK Groove with MTC User Manual
P. 211
10.05 Iron-On Transfer
Types of Iron-On Transfer
There are a number of different kinds of vinyl available at KNK USA:
Regular Iron-On Transfer (T-Shirt Vinyl)
Iron-On Flock
Glitter Flex and Glitter Flex Ultra
And more!
Cutting Iron-On
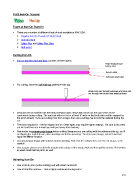
Iron-on transfer vinyl and flock consists of three layers:
Heat-resistant layer
(shiny side)
Iron-on vinyl
Adhesive (dull side)
For cutting, have the dull side up (adhesive side up):
Blade only cuts through adhesive and vinyl and
not through the thicker heat resistant layer
Because iron-on transfer has the heat protection layer, which will not be cut, this can serve as the
carrier/mat during cutting. The material will need to be at least 4” wide so that both sides will be gripped by
the pinch wheels. If you are cutting from from scraps, then use a cutting mat to hold the material during the
cut.
The force required is ~100 for regular iron-on. Other types may require higher settings. Be sure to do a test
cut first and then see if vinyl layer will peel away from backing.
Remember to reverse your image before cutting! Because you are cutting with the adhesive side up, you’ll
be flipping the material over, after weeding and before pressing. To mirror your image, select it and then
apply the Mirror function.
Cut around your image with scissors before weeding. Note that it’s really hard to see the cut image, so be
careful!
Use a paper piercer or craft knife to grab onto a piece of the waste vinyl and then pull to remove. Remember
to weed small internal parts, as well.
Adhering Iron-On
Use a hot dry iron (cotton setting) and with steam turned off.
Use a fairly firm surface…. Not a highly cushioned ironing board.
211