Page 188 - Klic-N-Kut User Manual
P. 188
Press Ctrl+K
Right click on screen and select Shape Magic>Rhinestone
Go to Edit>Shape Magic>Rhinestone.
There are some very specific guidelines to follow when designing a rhinestone pattern:
The shape needs to be sized before applying the rhinestone circles. If you wait until afterwards and then
realize that you want your overall design to be twice as large, then resizing will make the circles twice as
large and the spacing twice as large, too! So, before accessing the Rhinestone feature, decide on the
overall size you wish to use.
The circle size selected will need to be larger than the stone size you purchased. As a general rule,
select a size three numbers larger than your stones. Thus, if you purchased 10SS stones, then in the
rhinestone design window, you will want to be selecting 13SS stones. This larger size will allow the
10SS stones to more easily brush into the holes.
When selecting a font to use, be leery of “fancy fonts”. You want the lettering to be readable after it is
converted to circles. When in doubt, have someone who doesn’t know the words you’ve typed attempt
to read the circle design on the screen. If they cannot decipher your words, then try a more basic font.
Rhinestone designs almost always need “tweaking” which involves adding, deleting, moving, or re-
spacing circles. You will need to apply a Break (Ctrl-B) to separate the pattern into individual circles.
To quickly add a circle, select one, click on the Copy icon and then click on the Paste in Place icon and
drag the circle to its new location. Then you can continue to just click on Paste in Place to add more.
To re-space a row or column of circles, marquee-select and then use the shortcut keys, [ and ] to
provide equal vertical and equal horizontal spacing, respectively.
Rhinestone Outline
In this example, the initials from a high school will be outlined. As mentioned in the introduction to this
section, the first step is to size width and height of the lettering. Make sure there is enough space between
the letters so that the circles will not overlap. Also, you may want to resize the lettering vertically to make
the letters taller. This allows more circles to be applied and can improve the ability to read the text:
Letter is still 6” wide
Letter is 6” wide but but is now 3.6” tall
only 2.3” tall and will show up
better on the shirt
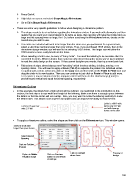
To apply a rhinestone outline, select the shape and then click on the Rhinestone icon. This window opens:
Select a circle size
larger than your stones
Select desired
Spacing
Click on Outline
Shapes
Click on Accept Preview of
Option to Delete Click on Preview when done. design
Original shape button to see effects
of settings
188