Page 187 - Klic-N-Kut User Manual
P. 187
Settings which will alter
A preview of how the the appearance of the
lattice will appear in lattice
the selected shape
Click on Apply & Preview
On Mat to see how the
current settings actually
look on your selected
shape.
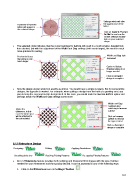
The selected circle indicates that the current settings for Lattice will result in a much smaller, detailed look
than desired. But with the adjustment of the Width and Gap settings (both made larger), the result is much
more practical for cutting:
Preview indicates Width and Gap both
the lattice is now increased
much larger.
Option to Delete
Original shape if no
longer needed
Click on Accept if
design is complete.
Now the design shown would cut exactly as shown. You would have a single cut piece. But for some lattice
designs, the opposite is wanted. For example, when cutting a design from the front of a greeting card, you
plan to keep the card and not the design itself. In this case, you would mark the Inverse Lattice option and
perhaps tweak the Width and Gap settings some more
Width and Gap
modified after
Notice the switching to Inverse
difference. In this Lattice
case the lattice part
will be attached to Click on Inverse
the cut material Lattice to reverse
the type created
Click on Accept if
design is complete
:
8.12 Rhinestone Design
Designing: Editing: Applying Simulations:
Checking circle size: Resizing Existing Patterns: Re-spacing Existing Patterns:
MTC’s Rhinestone feature provides both outlining and horizontal fill of shapes with the size of circles
needed for your rhinestones and the spacing desired. It can be accessed in any of the following ways:
Click on the Rhinestone icon on the Magic Toolbar
187