Page 200 - Klic-N-Kut User Manual
P. 200
Color: Set the mat to Contrast on the Virtual Mat tab. Make sure each shape is on its own layer, then
move the layers up or down so that the center of the flower is on top. Change the colors of the two sets of
petals and the center:
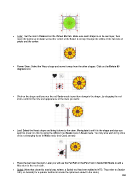
Flower Stem: Select the Wavy shape and move it away from the other shapes. Click on the Rotate 90
degrees icon:
Click on the shape until you see the red Scale mode icons then elongate the shape, by dragging the red
icons, until it is the size and appearance of the stem you want:
Leaf: Select the Heart shape and bring it down to the stem. Manipulate it until it is the shape and size you
want for a leaf. Do this by using the different red Scale icons in Scale mode. You may also wish to try some
of the red warping icons in Warp mode (red Quad arrows):
Place the leaf near the stem. Later you will use the Fat Path in the Pen Tool in Node Edit Mode to add a
little stem to the main stalk.
Spiral: (Note that since this tutorial was written, a Spiral tool has been added to MTC. Thus refer to Section
8.03, as desired) for a quicker method to create the spiral leaf added to the stem).
200