Page 178 - Klic-N-Kut User Manual
P. 178
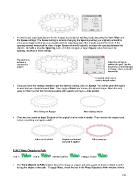
In order to get equal spacing and for the images to overlap for welding, begin tweaking the Vert. Align and
the Space settings. The Space setting is actually changing the Spacing setting you originally entered by
some percentage so that you can visually achieve equal spacing of the repeats around the circle. If the
spacing entered were positive, then a larger Space value will, logically, increase the spacing between the
objects. But with a negative Spacing, such as in this example, a larger Space value decreases the
spacing, resulting in more overlap:
The goal is to
achieve a Adjust the settings to
symmetrical achieve the goal. Use the
pattern arrow keys on the keyboard
to change values in smaller
increments.
If needed, click here to
reset to default values
Once you have the settings needed to get the desired overlap, click on Accept. You will be given the option
to weld and you should respond Yes. Then apply a Break and remove the interior shape. Move the oval
away or hide it so that the remaining scallop with eyelets can have a Join applied:
After clicking on Accept After deleting interior
Then we can create an Inset Shadow of the original oval to make it smaller. Then remove the original oval,
select everything and apply a Join:
Inline oval is added Original oval deleted Fill is turned on
and Join is applied
8.08.2 Warp Objects to Path
Part 1: Part 2: Stretch Extend: Filling a Frame
The Warp Objects to Path function forces the shape or shapes put onto a path, to bend or distort in order
to hug the shape of that path. To apply Warp, check the box in the Wrap Objects to Path window. Here’s
178