Page 177 - Klic-N-Kut User Manual
P. 177
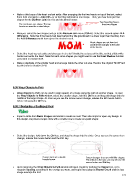
Make a third copy of the heart and set aside. After arranging the first two hearts on top of the text, select
them both and apply a Join (Ctrl+J), so that they will now be one shape. Thus, you now have just two
shapes for the Boolean Join: the text and the joined hearts:
Two bounding boxes,
The text forms one shape. The two thus two shapes
hearts are now the second shape
Marquee-select the two shapes and go to the Boolean Join menu (Ctrl+U). Select the second option: B-A
Difference. Note that if the hearts had been behind the title (positioned in a lower layer than the title), then
the A-B Difference would have given the desired result.
Heart shapes are cut from text
and the text changes to the color
of the hearts.
Select the heart you set aside and decrease in size to fit inside the cut area of the title, so that a little white
border surrounds the heart. Note that with some shapes you might need to use the Inset Shadow function
presented in Section 8.05.
Make a duplicate of the smaller heart and arrange inside the other cut area. Recolor the original “MOM” text
to pink (refer to Section 3.14):
8.08 Wrap Objects to Path
Wrap Objects to Path can be used to align repeats of a shape along the path of another shape. To open
the Wrap Objects to Path window, select the smaller shape, hold the Ctrl key and drag this shape into the
middle of the larger shape. As soon as you see the mouse cursor change, release the left mouse button
before releasing the Ctrl key.
8.08.1 Designing a Scalloped Oval
Import a circle from Basic Shapes and resize to create an oval. Then also import or open any design. In
this design, we joined a larger circle with a smaller one to create an eyelet shape:
Select the design, hold down the Ctrl key, and drag the shape into the circle. Once you see the cursor icon
change, release the mouse button and the Ctrl key.
Cursor starts as a double Cursor changes to an arc with little shapes.
headed arrow This indicates that you can now release the
mouse button and Ctrl key.
Upon releasing, the Wrap Objects to Path window will open. Begin by marking the Repeat box, set a
negative Spacing according to the overlap you want, and begin increasing the Repeat Count until the last
image overlaps the first:
177