Page 20 - Klic-N-Kut User Manual
P. 20
Landscape Virtual Mat Portrait Virtual Mat
8. To open the cutting control window, go to Cut Project With…>Klic-N-Kut Zing. A new window will
open asking which KNK Zing model you wish to use. Select the correct model and you may wish to
uncheck the box so that it doesn’t pop up every time you enter the cut window. (Don’t worry, there’s a
way to get it back if you ever feel you’ll need it. Refer to Section 2.10.)
Click here if you own the Click here if you own the
original KNK Zing model
KNK Zing Air model
Uncheck this box to prevent
this window from reappearing.
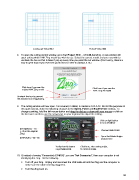
9. The cutting window will now open. It is covered, in detail, in Sections 2.02-2.08. But for the purposes of
this quick tutorial, make the following changes to the Speed, Force and Blade Offset settings. To
change a setting, hold the left mouse button and drag the dial up or down with your mouse or click on
the dial once and then use the arrow keys on your keyboard to adjust the setting:
Click on light button
to turn off Offset
Set Speed to ~ 15
(~10 on the original Choose Knife Point
Zing)
Open Set Blade Origin
Set Force to ~50 - 60 window here
Verify that this button Click here, after setting origin,
says Connected. to cut your shape.
10. If, instead of seeing “Connected (COM X)”, you see “Not Connected”, then your computer is not
identifying the Zing. Do the following:
Turn off your Zing. Unplug and reconnect the USB cable at both the Zing and the computer to
make sure the cable is firmly plugged in.
Turn the Zing back on.
20