Page 21 - Klic-N-Kut User Manual
P. 21
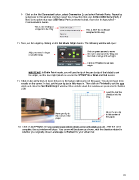
Click on the Not Connected button, select Connection (), and select Refresh Ports. Repeat by
going back to this window and then select the connection that says COMX (USB Serial Port). If
there is no option that says USB Serial Port (as shown below), then refer to Appendix B –
Communication Issues.
This is the COM port
assigned to the Zing This is NOT the COM port
assigned to the Zing
11. Next, set the origin by clicking on the Set Blade Origin button. The following window will open:
Click on green arrows to move
Adjust to move in larger
or smaller steps the mat in and out of the Zing and
the blade carriage left and right.
Click on Finished to set new
origin.
IMPORTANT: In Knife Point mode, you will use the tip of the pen (or tip of the blade) to set
the origin, not the laser light (which is used in the WYSIWYG or Print and Cut modes.
11. Click on the arrow keys to move the pen to the bottom right corner of the paper. You do not have to be
exactly on the corner. In fact, set the pen tip just a little ways in. Then click on Finished to set this new
origin and close the Set Blade Origin window. More details about this window are presented in Section
2.08.
Feed the mat this
direction into the
Zing
Move the pen tip
Move pen tip to to this corner of
this corner of the the paper.
paper.
12. Click on Cut Project and your arrow shape will be drawn at the new origin you set. After the cut is
complete, the cut window will close. Your arrow will be drawn as shown, with the direction related to
whether you originally chose Landscape or Portrait for your virtual mat:
21