Page 26 - Klic-N-Kut User Manual
P. 26
Adjust Blade Offset If Needed
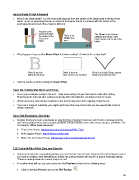
What is the blade offset? It is the horizontal distance from the center of the blade shaft to the tip of the
blade. A pen or engraving tool has an offset of 0 because the tip is centered with the center of the
pen/engraving tool shaft. But a blade is different:
Imagine a line
passing through
the center of the There is no The Offset is the distance
between the center of the
test pen or Offset on a blade holder and the tip of the
blade pen. blade.
What happens if you set the Blade Offset to 0 when cutting? Or what if it’s set too high?
Offset is too low: Offset is too low: Offset is too high: Divots appear
paths do not close outer corners are rounded inside and around corners
Refer to Section 2.06 for setting the Blade Offset.
Keep the Cutting Mat Clean and Sticky
Press your materials evenly to the mat. Think about using a brayer both before AND after cutting.
Repressing the material after cutting can greatly aid in weeding the cut shapes from the waste.
When necessary, tape thicker materials to the mat to keep them from slipping during the cut.
If you cut a range of materials, you might need more than one mat so that you can use stickier mats for
certain materials.
Don’t Get Frustrated, Get Help!
Besides having your own Zing dealer as your first line of contact, there are user forums, message boards,
and Yahoo groups where you can post questions and get answers from other users, dealers, and Make The
Cut experts. Utilize these resources:
Zing Yahoo Group: http://groups.yahoo.com/group/KNK_Zing/
KNK Support Forum: http://knkusa.com/forums/
Make The Cut Yahoo Group: http://groups.yahoo.com/group/makethecut/
2.02 Cut with Klic-N-Kut Zing and Zing Air
Before accessing the Zing cutting window, you need to have at least one shape on the current page to cut. If
you have no shapes, then attempting to access the cutting window will result in a popup message stating,
“There is nothing inside the current project to cut!”
To confirm what will cut, you can access the Cut Preview function in the following ways:
Click on the Cut Preview icon on the File Toolbar
26