Page 27 - Klic-N-Kut User Manual
P. 27
Press Ctrl+Shift+E
Go to Cut Project With…>Cut Preview.
The cut preview will display the shapes that will be cut. Immediately invoking the function again will show
the “material” with the cut shapes removed. This is also sometimes called the negative:
Shape as shown Shape shown with first Shape shown after second
on Virtual Mat click of Cut Preview click of Cut Preview
The Cut with Klic-N-Kut Zing window can be accessed in the following ways:
Click on the Cut Project With icon on the File Toolbar
Press Ctrl+Shift+C
Go to Cut Project With…>Klic-N-Kut Zing…
The following window will open asking which KNK Zing model you wish to use. Select the correct model and
you may wish to uncheck the box so that it doesn’t pop up every time you enter the cut window. (Don’t
worry, there’s a way to get it back if you ever find you need to change. Refer to Section 2.10.)
Click here if you own the
original KNK Zing model Click here if you own the KNK
Zing Air model
Uncheck this box to prevent
this window from reappearing.
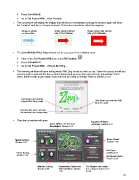
Then the cut window will open:
Updates, Presets,
Laser Offset: Section 9.02 and Help: Section 2.10
Resolution: Section 2.12
Speed Settings: Blade Offset:
Section 2.03 Section 2.06
Cut Type:
Force Setting: Section 2.07
Section 2.04 Set Blade Origin:
Section 2.08
Multicut Setting: Connection Status and Cut Project: will initiate
Section 2.05 Test Cut Menu: Section the cutting of shapes sent
2.09 to cut
27