Page 28 - Klic-N-Kut User Manual
P. 28
Refer to the Section numbers shown for instructions on each setting. The Cut Project button doesn’t need
its own section as it simply initiates the cut once you have made your other settings.
To change a setting that has a dial, hold down the left mouse button and move your mouse up to increase
the setting or down to decrease the setting. Alternatively, left click on the dial once and then use the up and
down arrows on your keyboard to change the setting.
The movement within the Zing logo can be toggled on and off by left clicking on the logo.
2.03 Speed
There are two Speed settings: Cut and Up:
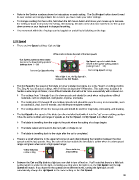
White marks indicate the start of the fast speeds.
Cut Speed: speed at which blade
travels in the down/cutting position Up Speed: speed at which blade
(settings from 1 – 38) travels in the up/not-cutting position
(settings from 1 – 38)
Current Cut Speed setting Current Up Speed setting
When light is on, the Up Speed is
locked to the Cut Speed.
The Cut Speed is the speed of the blade (or other installed tool) while it is in the “down” or cutting position.
The Zing Air has 38 speed settings, with 9 of them being below 100mm/sec. This cutter was designed to
handle a wide range of thicker, more difficult materials that will cut far more successfully with a slower cut.
The settings from 1 through 9 are the slow speeds and should be used when cutting dense difficult
materials, such as chipboard, craft plastic, styrene, and balsa.
The setting from 10 through 20 are medium speeds and should be used for easy-to-cut materials, such
as cardstock, vinyl, iron-on transfer, and rhinestone template material.
The settings above 20 are the fast speeds and should be used for engraving, embossing, and drawing.
The Up Speed is the speed of the blade (or other installed tool) while it is in the “up” or non-cutting position.
It has the same number and range of speeds as the Cut Speed. An Up Speed is in effect when:
The blade is travelling from the origin to the point where the cutting of a shape begins
The blade raises and moves to the next path or shape to cut
The blade is travelling back to the origin after the cut is completed.
There is a small white line in the upper left corner of each dial indicating the transition between the slow
speeds and the fast speeds. Also, the color of the bar outside the two dials is yellow when in a slow speed
range and green when set in a high speed range:
Yellow indicates Green indicates
a slow setting a fast setting
Between the Cut and Up dials is a light you can click to turn off and on. You’ll note that there is a little lock
symbol which is a label for the light, reminding you that when the light is on, the Cut Speed and the Up
Speed will match. If you have the two speeds set at different levels, turning the light back on will
automatically change the Up Speed to the same setting as the Cut Speed.
28