Page 30 - Klic-N-Kut User Manual
P. 30
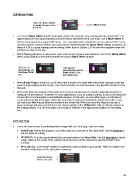
2.06 Blade Offset
Adjust the Blade Offset,
if needed. Range is from Current Blade Offset.
0 to 0.95.
The default Blade Offset of 0.25 should work well for the majority of your cutting with the included 45˚ red
capped blade (for red capped blades purchased before November 2013, use 0.35). Use a Blade Offset of
0.75 for the included blue capped 60˚ blade. The Zing fabric blade should also use an offset of 0.75. If you
use other brands of blade holders, you may need to experiment with the Blade Offset setting. In general, an
offset of 0.30 is a good starting point for testing. Refer back to Section 2.01 to note what happens when the
setting is too high or too low.
When drawing with pens or using other tools, such as the engraver and embosser, turn off the Blade Offset
(set to 0) by clicking on the button beneath the current Blade Offset window:
Click here to Click again to
automatically set automatically reset the
the Blade Offset Blade Offset to the
to 0. last setting used.
When Blade Offset is turned on, you’ll notice that a small cut is made before the blade carriage moves the
blade to begin cutting the first shape. This small correction cut sets the blade in the direction needed for the
first path.
Most of the time, the location of this small cut is not an issue because it is made in what will usually be a
waste part of the material. However, for some applications, such as cutting a stencil, it may not be desirable
to have this cut in the location it automatically chooses. In this case, you can either tape a small piece of
scrap material on top of the place where the correction cut occurs to protect the material beneath, or you
can add a tiny little line just below the border of the virtual mat. When you send the shapes to be cut, a
popup message will warn you that there are shapes outside of the Virtual Mat. Click on Yes to continue to
the cutting window. You can then place a tiny scrap of material in the appropriate location on the cutting
mat.
2.07 Cut Type
There are three modes in controlling where images will cut to the Zing. They are called:
Knife Point: Moves the shapes to cut at the origin you have set on the cutter itself. Use the blade tip to
set the origin for cutting.
WYSIWYG: Cuts the shapes where they are positioned on the Virtual Mat. Use the laser light to set the
origin- either at the corner of the cutting mat or the corner of the material (as described later in this
section).
Print and Cut: Cuts shapes relative to registration marks printed on your printer. Refer to Chapter 9 for
complete instructions on the print and cut process.
Select Cut Type
mode to be used
30