Page 35 - Klic-N-Kut User Manual
P. 35
Note that raster images (.JPG, .BMP, .PNG etc.) will need to be pixel traced first so that cut lines are
created. Refer to Chapter 6 for tutorials on how to do the pixel tracing (also called vectorizing).
Refer to Chapter 9 for tutorials on the print and cut process, including calibrating the laser.
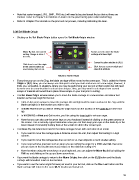
2.08 Set Blade Origin
Clicking on the Set Blade Origin button opens the Set Blade Origin window:
Move By dial and current Arrows used to move the blade
setting. Range is from 4 carriage and laser light
to 1016.
Current location relative to [0,0]
Click here to set the origin
at the same location as Click here to set new origin and
used during the last cut. close this window.
Return to Home Origin
Every time you turn on the Zing, the blade carriage will be moved to the same spot. This is called the Home
Origin or [0,0]. Now, you can always use that spot to start your cuts and never set a new origin, however, it
limits you, somewhat, in situations where you may be performing your test cut at that location but will need
to move over to a new location to cut out your shapes. Also, you may want to cut shapes from several
scraps of material and would like to place those scraps on your mat prior to cutting.
The Set Blade Origin window allows you to move the blade carriage to a new location and define that
location as the new origin for that cut:
Click on the green arrows to move the carriage left and right and the mat in and out of the Zing until the
blade carriage is in the location you wish to use.
In Knife Point mode you will be setting the origin based on the location of the blade tip (or other tool
tip).
In WYSIWYG or Print and Cut modes, you’ll be using the laser light to set your origin.
Note that you can also use the arrow keys on your keyboard instead of clicking on the green arrows on
the screen. This is actually a great alternative since you can then keep your eyes on the blade tip or the
laser instead of constantly looking back at the screen to click in the correct spot.
The Move By dial determines how far the blade carriage moves with each click of an arrow:
If you need to move the carriage quite a distance across the mat, then adjust that setting to a high
number.
If you need to move the carriage less than an inch or so, then adjust to a much smaller setting.
If you need extreme precision such as when you are setting the origin for a Print and Cut, then once
you are close to the location you need, reduce to the minimum setting of 4.
Note that when using the arrow keys on your keyboard, you can adjust the Move By dial by holding the
Ctrl key and clicking on the up and down arrow keys.
If you want the blade carriage to return to the Home Origin, then click on the [0,0] button and the blade
carriage will immediate return to that location.
If you want to use the same origin that was just used in your last cut, click on the Use Last button and the
blade carriage will return to the same [X,Y] location previously set.
35