Page 67 - Klic-N-Kut User Manual
P. 67
Go to Edit>Clear Undo History.
Limit the number of Undo/Redo steps stored in memory. To do this:
Go to Help>Advanced>Advanced Settings. Under Undo/Redo Buffer Size, check the box next
to Limit Undo/Redo Size:
Check this box
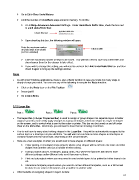
Upon checking this box, the following window will open:
Enter the maximum number
of Undo steps to be stored Click on Set
(or 0 for unlimited)
Enter the maximum number of steps to be saved. You will then need to save any current files and
close/reopen them for the change to take effect.
If you wish to change this setting, you will need to uncheck the Limit Undo/Redo Size box and then
check it again to bring up the settings window.
Redo
As with most Windows applications, there is also a Redo function in case you Undo too many steps or
simply change your mind. You can use any of the following to execute the Redo function:
Click on the Redo icon on the File Toolbar
Press Ctrl-Y
Go to Edit>Redo.
3.12 Layer Bar
Part 1: Part 2: Part 3:
The Layer Bar (or Layer Properties Bar) is used to assign or group shapes into separate layers to better
organize your file, more easily apply changes to a group of shapes, select one shape or a layer of shapes
on the screen, and to control what is sent to the cutter or printer. This bar can be turned on and off under
View on the Menu Bar. Most likely, you will want to have this bar showing at all times.
You do not have to worry about adding shapes to the Layer Bar. They will be automatically assigned to the
current layer or a new layer as you add them. You will want to learn how to move shapes to new layers or
combine shapes into the same layer, depending on the circumstances.
Here are a few examples of when you would want to have shapes on different layers:
Paper piecing or shadowed shape projects where some shapes will be cut from one color and other
shapes from another color (or a number of other colors).
Fold-up projects (boxes, envelopes, popup cards, etc.) where the fold lines will need to have
different settings and/or different tools used than your cut lines.
Print and cut projects where you may need to send certain layers to be printed but other layers to be
cut.
Rhinestone template projects where you need to cut two different templates, such as a fill that will
be done in one color of rhinestones and an outline in another color.
Other benefits of assigning shapes to layers include:
67