Page 73 - Klic-N-Kut User Manual
P. 73
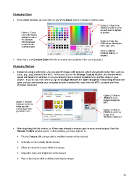
Changing Color
In the Color window, you can click on any of the Basic colors or create a custom color.
Option 2: Click in the
window and then scroll
up and down to lighten
Option 1: Select or darken
one of the Basic
colors or one of
the Custom
colors already Option 3: Enter the
created in the RGB values directly (or
current project Hue, Sat, Lum)
Click on Add to
Custom Colors, if
desired
Note that a new Custom Color will only be saved and available in the current project.
Changing Texture
Instead of using a solid color, you can also fill shapes with textures, which are typically raster files, such as
.bmp, .jpg, .png, imported into MTC. When you access the Change Texture function, the window which
opens will depend on whether or not you already have a texture available from another shape in your
project. If you do not, then when you go to Change Texture, the Open Image for Texturizing window will
open and you can browse your computer to open a texture file, scan one into MTC, or paste one from
Windows Clipboard:
Option 2: Click on
TWAIN to scan
texture image into
Option 1: Browse MTC
computer to locate
folder and file
containing texture Option 3: Click on
you wish to use PASTE to paste an
image from
Windows Clipboard
After importing this first texture, or if there was already a texture open in your current project, then the
Choose Texture window opens. In this window, you have options to:
Tile the Texture (fill a shape with a modified version of the texture)
Vertically or horizontally flip the texture
Offset or move the texture within the shape
Adjust the color and brightness of the texture
Resize the texture with or without resizing the shape
73