Page 24 - KNK Groove with MTC User Manual
P. 24
Go to Cut Project With…>Cut Preview.
The cut preview will display the shapes that will be cut. Immediately invoking the function again will show
the “material” with the cut shapes removed. This is also sometimes called the negative:
Shape as shown Shape shown with first Shape shown after second
on Virtual Mat click of Cut Preview click of Cut Preview
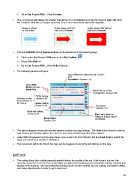
The Cut with Klic-N-Kut Series window can be accessed in the following ways:
Click on the Cut Project With icon on the File Toolbar
Press Ctrl+Shift+C
Go to Cut Project With…>Klic-N-Kut Series…
The following window will open:
Laser Offset (or alignment pin): Section
9.02
Resolution: Section 2.10
Select KNK
Model and set
Baud Rate Serial Port and Test
Connection: Section 2.08
Force Setting:
Set these on the Section 2.03
Control Panel of
the Groove Speed Setting:
Section 2.04 Cut Type:
Section 2.07
Multi-cut Setting:
Section 2.05 Start: will initiate the
cutting of shapes sent to
Blade Offset: cut window
Section 2.06
The above diagram shows the relevant section numbers for each setting. The Start button doesn’t need its
own section as it simply initiates the cut once you have decided upon the other options.
Select KNK Groove-E from the drop down menu under Klic-N-Kut Model. Set the Baud Rate to match the
baud rate selected in Section 1.05 Step 4.
The movement within the Klic-N-Kut logo can be toggled on and off by left clicking on the logo.
2.03 Force
The cutting force (also called pressure) greatly affects the quality of the cut. If the force is too low, the
material cannot be cut. If the force is too high, you will get bad cutting (even incomplete cutting at times) and
tearing of the material. Use recommended starting forces for the material you are cutting, test before cutting,
and make adjustments in order to get a clean cut.
24