Page 21 - KNK Groove with MTC User Manual
P. 21
o
The 45 blade (red cap) should be used to cut vinyl, paper, smooth cardstock, Dura-lar, Mylar, iron-on
transfer, vellum
o
The 60 blade (blue cap) should be used to cut textured cardstock, chipboard, Grungeboard, stiffened
felt, craft foam, rhinestone rubber, craft plastic, self-adhesive magnet, styrene, Magic Mesh, and Shrinky
Dink.
The fabric blade should be used to cut all fabrics and unstiffened felt.
Set the Blade Length/Exposure Correctly
Note: This video applies to all KNK blade holders
When setting the blade length/exposure, hold the blade holder up next to the material before pressing the
material to the mat, so that you can more accurately set the length to match the thickness of the material.
For really thin materials, like vinyl and paper, just the very tip of the blade will be protruding from the bottom
of the blade holder. In fact, you should just barely be able to feel it with your finger and not be able to see it
very well, if at all.
A good way to test your blade length is to fold a piece of the material onto itself and then cut a line into the
material by hand, as shown in the video linked in this section. If the blade cannot cut through the material,
you will need to extend the blade. If the blade cuts through the material and cuts into the next layer, you
need to retract the blade. If the blade cuts through the material but does not nor scratch the layer below, you
have the perfect length.
Having the blade fully extended will never result in better cutting. In fact, it can cause skewing, tearing of the
material, damage to the blade, and damage to the mat.
When conducting the test cut, be sure to check your mat for cut lines after the test. You should be able to
set the length to get clean cuts but with no visible markings on the mat. If you do see cut lines in your mat,
retract the blade a bit and repeat your test cut.
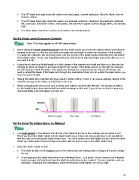
Material
Mat
Perfect Length Too Long Too Short
Set the Blade Tip Height Above the Material
The blade height is the distance from the tip of the blade to the top of the material you are about to cut.
When you insert the blade holder into the blade holder seat, it does not necessarily have to be positioned
with the outer rim touching the blade holder seat. You have control over that height and can raise the blade
holder up a little higher before locking it into place with the front screw on the blade holder seat.
Adjust the blade height so that:
The blade tip will not be dragging across the material you are cutting when moving to the point to begin
the cut.
The dropping of the blade will invoke more downward force… to a point! Thinner, easy-to-cut materials
(such as paper and vinyl) can have the blade tip fairly close to the material. Denser materials, such as
cardstock, chipboard and craft plastic, need the blade tip a little higher, but not too high:
21