Page 22 - KNK Groove with MTC User Manual
P. 22
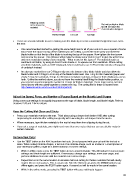
Blade tip needs
to be above the But not too high or blade
material tip will not reach the
material when dropped.
Perfect Height Too Low Too High
There are several methods to use in making sure the blade tip is set at a consistent height from one cut to
the next:
One recommended method for getting the same height set for all of your cuts is to use a spacer of some
kind. Place the spacer on top of the material you are cutting. Loosen the front screw and insert the
blade holder so that the tip of the blade is touching the top of the spacer. Now tighten the front screw
and remove the spacer. This distance will provide the blade some “punch room” to give the extra force
and more consistent cutting of your material. What to use for this spacer? For materials such as
cardstock and fabric, try using 25 Post-It note sheets or 12 squares cut from cardstock. When cutting
very thick materials, such as 0.03” chipboard, felt, or craft foam, use 13 Post It note sheets or 6 squares
of cardstock instead.
An alternate method is to cut O Rings to slip over the bottom of the blade holder and then allow the
blade holder and O Rings to sit on top of the blade holder seat. Use 1 ring for thin materials (paper and
vinyl), 2 rings for cardstock, 3 rings for rhinestone template materials, 4 rings for thick chipboard, and so
forth. Unlike the method above, you do not have the material itself lifting the blade holder position, so
you need to keep increasing the number of O rings for thicker materials. These rings can be cut from
cereal boxes with two glued together to create one ring. The cutting file for these is located here:
http://www.iloveknk.com/FreeFiles/KNK/Important/
Adjust the Speed, Force, and Number of Passes Based on the Material and Shapes
Using correct cut settings is as equally important as the type of blade, blade length, and blade height. Refer to
Sections 2.03 and 2.04 for details.
Keep the Cutting Mat Clean and Sticky
Press your materials evenly to the mat. Think about using a brayer both before AND after cutting.
Repressing the material after cutting can greatly aid in weeding the cut shapes from the waste.
When necessary, tape thicker materials to the mat to keep them from slipping during the cut.
If you cut a range of materials, you might need more than one mat so that you can use stickier mats for
certain materials.
Perform Test Cuts!
Use the TEST button on the KNK to perform test cuts. Do not proceed with your cut until the test cut is
clean. When cutting intricate shapes, a test cut of an intricate image, such as a letter or a small portion of
your rhinestone pattern, might be a better indicator of correct settings.
While in offline mode, press the TEST button to cut a small rectangle. This will indicate if your pressure
settings and blade length are sufficient. If necessary, change your settings, move your origin, and
perform additional test cuts until the material cuts a clean shape.
Repeat test cut in the same location to simulate multi-cut cutting for thicker materials that will clearly
require two or more passes. This is easy to do. After the first test cut, press the Online button to go
offline again, and press the TEST button again. A second cut will be made in the same location.
While in the online mode, pressing the TEST button will cause nothing to happen.
22