Page 101 - Klic-N-Kut User Manual
P. 101
In this example, Manual Size was selected but you can also try Auto Size again, too! The Bézier Warp
process is about experimenting and having fun with it! If you like certain settings, remember that the option
to save settings (Presets) is available.
5.09 Creating an Overlay Title and Welding Text to Frames
Creating a frame for welding single letters or images is very easy. Using the steps in Section 5.03, create a
title. The font chosen for this example is Times New Roman. Also, Split By Glyphs is selected so that
individual letters can be resized, if needed, to overlap the frame:
Click on the Import Basic Shapes icon on the Import Toolbar and select Polygons. Scroll to locate the
Rectangle shape and double click to add to the screen:
On the Virtual Mat settings tab on the Main Bar (refer to Section 4.04), make sure you have Outline mode
selected so that you will be able to see the rectangle and the letters clearly. Also, change to No Snapping
under Snap Position so that you can resize the rectangle and letters with precision.
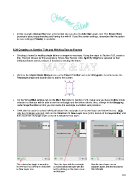
It will also be easier to select individual letters if the rectangle is on its own layer and below the text. With
only the rectangle selected, click on the Selection to New Layer icon (at the bottom of the Layers Bar) and
then move the rectangle layer so that it is below the text layer:
The selected rectangle is moved to Then, the layer with the rectangle Now the two shapes are on
its own layer by clicking on Selection is moved below the layer with the separate layers with the text above
the rectangle
to New Layer icon.
text by clicking on the down arrow
on that layer
101