Page 106 - Klic-N-Kut User Manual
P. 106
6.02 Finding Easy Images to Trace
What qualifies as an easy image? The obvious answer is “an image which gives you the results you want!”
But those who are new to the vectorizing process do not always realize which images are going to be easy
and which ones are not. Note that you shouldn’t be discouraged from trying to trace anything. But when you
are learning the process, working with easier images will make the learning stage go smoother. So here are
a few guidelines in selecting images:
Black and white images are easier to vectorize than colored images
Colored images with flat colors are easier to trace than those with variegated colors
Large, high resolution images are easier to trace than tiny, low resolution images
Images with tiny details will be more difficult to trace than simpler images with fewer details
Photographs are usually the most difficult to trace, especially when some of the colors blend (such as
the brown dog on the brown carpet, mentioned earlier).
For your own personal use, there are many images that can be found on the Internet. Use Google Images to
search and find images based on keywords. Google Images also has filters at the top of the window (under
Search Tools) to limit your search to black and white, as well as to clipart or line drawings. Use these filters!
6.03 Pixel Trace
Intro: Tracing for a PNC: Trace and Edit Example:
To begin the Pixel Trace process, it is recommended that you first double click near the top left part of the
Virtual Mat. This will plant the Caret at that location and, as you play with the trace settings, you’ll be able
to see the results of the current-selected settings.
The next step is to import a raster image. You can access the Open Image for Tracing window in any of
the following ways:
Click on the Pixel Trace icon on the Import Toolbar
Press Ctrl-Shift-T
Go to File>Import>Pixel Trace
Drag and drop a raster image into a running instance of MTC.
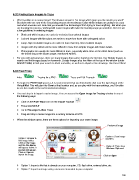
When the window opens, there are three options for importing your raster image:
Preview of image
Option 2: Scan image
Option 1: Browse to into MTC
find image folder.
Click on the image
and the File Name Option 3: Paste from
will appear below. A Windows Clipboard
preview will appear.
Click on Open to
import the image.
Click on Open
Option 1: Import a file that is already on your computer, CD, flash drive, external drive, etc.
Option 2: Import an image using a scanner connected to your computer
106