Page 61 - Klic-N-Kut User Manual
P. 61
Deleting
To delete a selected shape, use any of the following options:
Press the Delete key
Press Ctrl-X
Right click on the screen and choose Delete from the menu
Go to Edit>Delete.
Located the shape on the layer to which it is assigned and click on the Delete Shape icon:
To delete all of the shapes in the current project, use any of the following options:
Right click on the screen and choose Delete All from the menu
Press Shift+Delete
Go to Edit>Delete All.
You can also delete a layer of shapes at one time from the Layer Bar. Refer to Section 3.12.
To delete all of the tiny shapes not wanted in your project, use any of the following to access the Delete by
Area option:
Right click on the screen and choose Delete By Area from the menu
Press Ctrl-Shift-R
Go to Edit>Delete by Area.
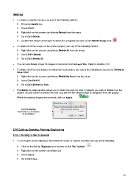
The Delete by Area window allows you to select the size, by area, of objects you wish to delete from the
project. As you scroll to increase the size, you will see the shapes begin to disappear from the project.
When the desired shapes are removed, click on Apply:
Scroll to desired
maximum size of objects
to be deleted
3.10 Cutting, Copying, Pasting, Duplicating
3.10.1 Cutting to the Clipboard
To cut shapes to the clipboard, first select the shape or shapes and then use any of the following:
Click on the Cut to Clipboard icon located on the File Toolbar
Right click on the screen and select Cut
Press Ctrl+X
Go to Edit>Cut.
61