Page 146 - Klic-N-Kut User Manual
P. 146
Press Ctrl+Shift+N
Right click on the screen and choose Shape Magic>Advanced>Tiler from the menu
Go to Edit>Shape Magic> Advanced>Tiler.
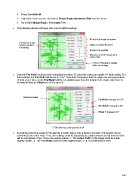
The following window will open with a set of default settings:
W and H of shape on screen
Preview of shape
broken into tiles Option to adjust W and H
for cutting
W and H of each tile
Distance to offset horizontal of
vertical tiles
Click on Preview to update
with new settings.
Only the Tile Width must be set to something less than 15” since the cutter can handle 14” wide cutting. For
this example, the Tile Width will be set to 13.5”. Note that it is assume that the cutter can cut long sections
of vinyl at one time, so the Tile Height will be set slightly larger than the height of the shape. Also there is
no need to have an Offset yet, so it is set to 0:
Revised preview
Tile Width changed to 13.5”
Tile Height changed to 66”
Offset Y changed to 0”
5 tile only has a tiny part of a leaf!
th
Everything looks fine except for the last tile in which there’s only a fraction of a leaf. This wouldn’t be an
economical use of the vinyl. Thus, the settings could be adjusted just a slight amount so that only four tiles
will be cut instead of five. There are several options: 1. The Actual Width of the image could be made
slightly smaller, 2. The Tile Width could be made slightly larger, or 3. A combination of both:
146