Page 150 - Klic-N-Kut User Manual
P. 150
7.09 Slice Shapes and Lines (Knife Tool)
th
The Slice Shapes and Lines function (Knife Tool) is the 9 icon on the Node Mode Toolbar and can
be activated by clicking on the icon or pressing F9. It is used to cut an existing shape or shapes along
straight lines or freely drawn paths.
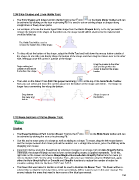
For example, let’s use the Secret Agent Man shape from the Basic Shapes library. Let’s say you want to
remove the bottom of the shape so that when cut, the shape would still be attached to the material and
could be folded up:
The Knife Tool will be used to
remove the bottom line of this shape.
To slice off just the bottom of the shape, select the Knife Tool and hold down the mouse button outside of
the shape on one side, just barely above the bottom of the shape and then drag the mouse over to the other
side, letting go once the cursor is outside of the shape:
Drag the mouse to the other
Begin cutting just side and let go when the
outside of and above cursor is beyond the shape
the bottom the shape. border.
Then click on the Select Tool (Edit this project normally) at the top of the Node Mode Toolbar.
Now you can select and move the cut line away from the bottom of the shape and delete. The shape no
longer has a connecting line along the bottom:
Drag bottom Shape is open at
line away and the bottom.
delete.
7.10 Erase Sections of Paths (Eraser Tool)
Erasing
th
The Erase Sections of Path function (Eraser Tool) is the 8 icon on the Node Mode toolbar and can
be activated by clicking the icon or by pressing F8.
Use this tool to erase parts of a shape as well as adding to a shape. To erase, drag the left mouse button
and the shapes beneath that drawn path will be deleted. For a straight line erasure, press the Ctrl key while
dragging your mouse.
Important! Before using the Eraser tool for extensive changes to an image, turn off Auto Simplify Paths.
Otherwise, the shape will begin to lose its form as the simplify process is applied repeatedly. To do this,
right click on the screen and choose Shape Magic>Advanced>Auto Simplify Paths from the menu (or
refer to Section 7.02.1 for the other methods). Then, after you have finished using the Eraser tool, apply
either the Auto Simplify Path or Smooth and Simplify functions to reduce the number of nodes for
smoother cutting. Refer to Sections 7.02.2 and 7.02.3.
The flower that was traced in Section 6.03 will be used to illustrate the Eraser Tool. The flower will be re-
colored blue so that the red eraser lines, in the screenshots, will be easier to see in this user manual. The
arrows indicate the areas that need to have some of the blue layer erased:
150