Page 153 - Klic-N-Kut User Manual
P. 153
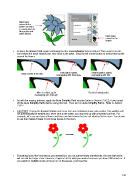
Black layer
moved to the
bottom so that it
is now behind the
blue petals and
green leaves.
Black layer
moved to the
bottom.
Activate the Eraser Tool, again confirming that the Inverse Eraser box is marked. Then zoom in on the
area where the black shadow was very close to the petal. Drag the left mouse button to extend that border
around the flower:
Black border is too thin. First path is added, Another path is added,
overlapping with thick area. overlapping with first.
More is added, again Result of added paths.
overlapping with first path.
As with the erasing process, apply the Auto Simplify Path function (refer to Section 7.02.2), if you turned
off the Auto Simplify Paths before using this tool. Then turn on Auto Simplify Paths. Refer to Section
7.02.1.
CAUTION! If using the Inverse Eraser and cross from one individual shape into another, this addition will
not automatically be welded and, when sent to the cutter, you may end up with unwanted cut lines. For
example, let’s say you have a flower and there are two leaves that are not attached to the stem. You decide
to use the Inverse Eraser to join those leaves to the stem:
Everything looks like it worked as you wanted but, you cut out the flower stem/leaves, the new leaf stems
will cut into the larger stem. However, it appears to be what you wanted because you have Fill turned on. If
you switch to Outline mode and zoom in on the leaves, you’ll see this:
153